Overview
After completing the installation of the summary server, the network administrator must define the Scope of management. SoM policy refers to the list of computers that are to be managed in the network. They can be added via active directory, workgroup or any other directory service.
We can split the Scope of Management Policy into two views:
- Summary Server Admin View.
- Probe Administrator View.
Summary Server Administrator View :
As the summary server administrator, you can monitor the status of all the probes of the network, including all the devices linked to the probes. You can also create domains/workgroups and configure agent settings. The changes made in the Summary Server Admin scope will apply to all probes of the network.
Some of the functionalities that can be configured by the Summary Server Administrator:
- Add domain.
- Configure agent settings.
Steps to add a domain:
- Login to Endpoint Central as summary server administrator and select 'All probes' scope.
- Go to Admin -> Scope of Management -> Domain
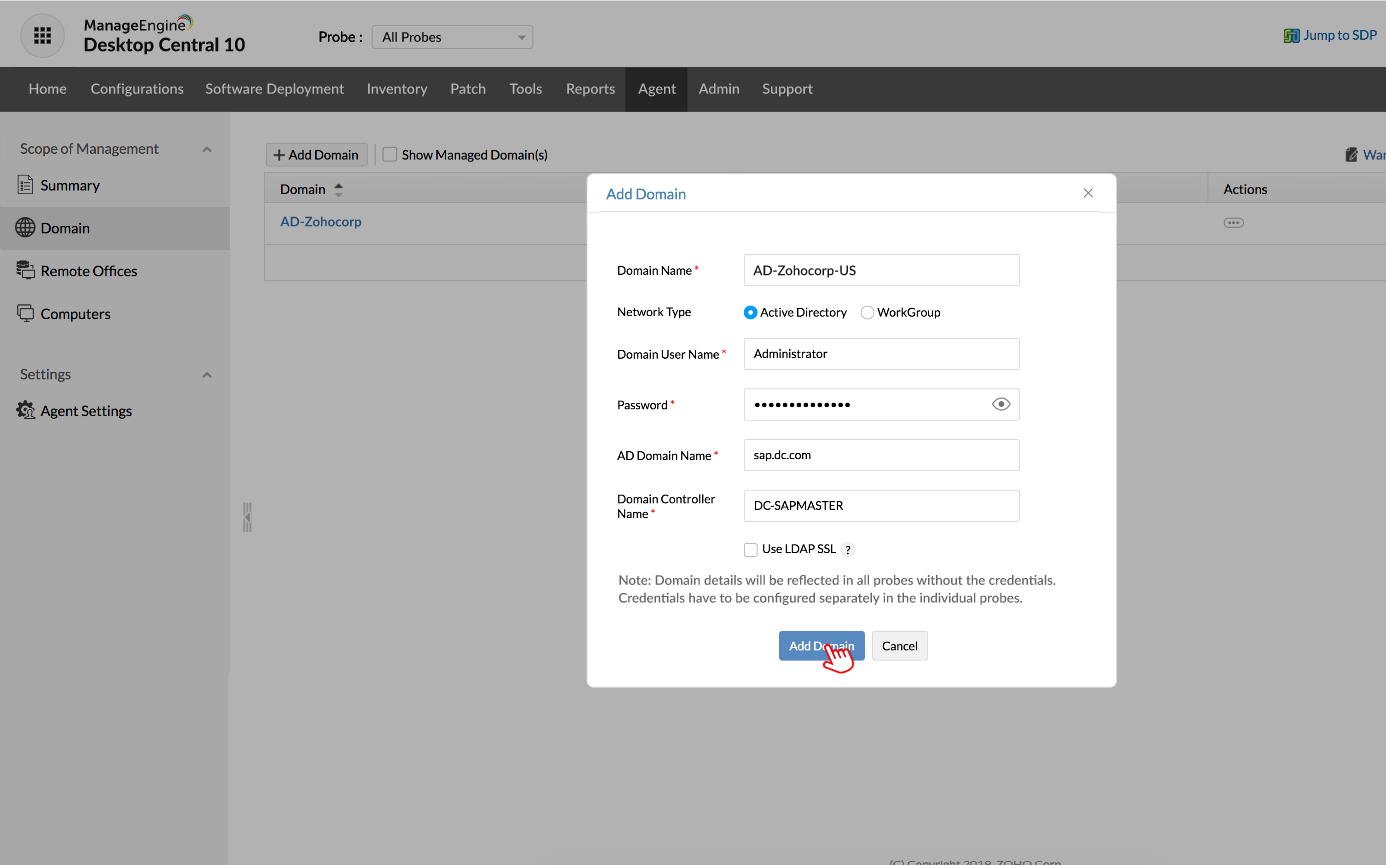
- Click on add domain.
- Fill in the domain name, network type and credentials of the domain. Please note that the domain credentials will have to be configured separately in the individual probes for security purposes.
Click on add domain.
After adding the domain in the all probes view, you must configure the credentials of the domain in the specific probes.
Steps to configure credentials in a specific probe after adding a domain as Summary server Admin:
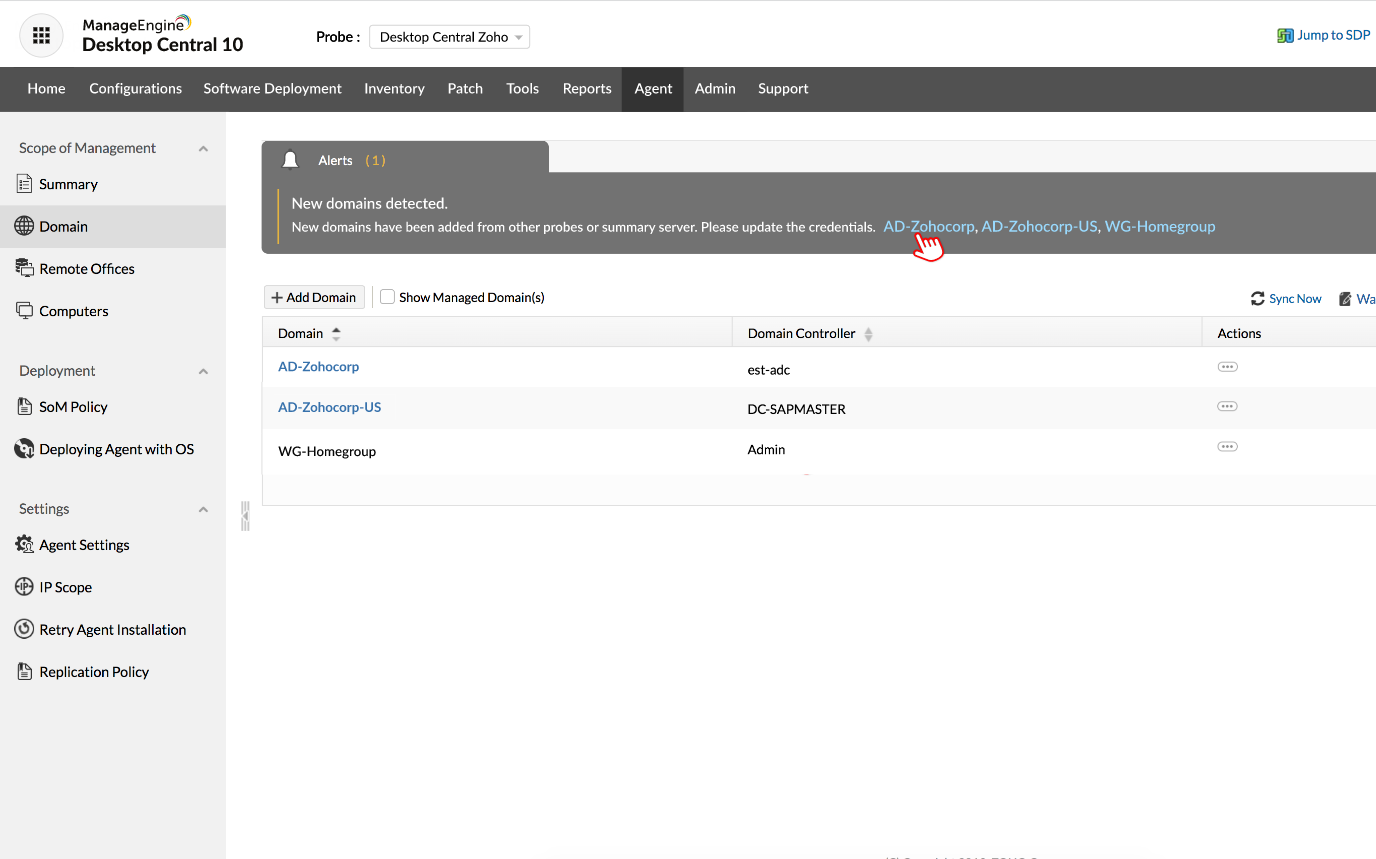
- Login to Endpoint Central as probe administrator.
- Navigate to Admin ->Scope of Management -> Domain.
- If a domain is detected, you will receive an alert 'New domains detected'. Click on the domain to configure the credentials.
- Enter domain username and password.
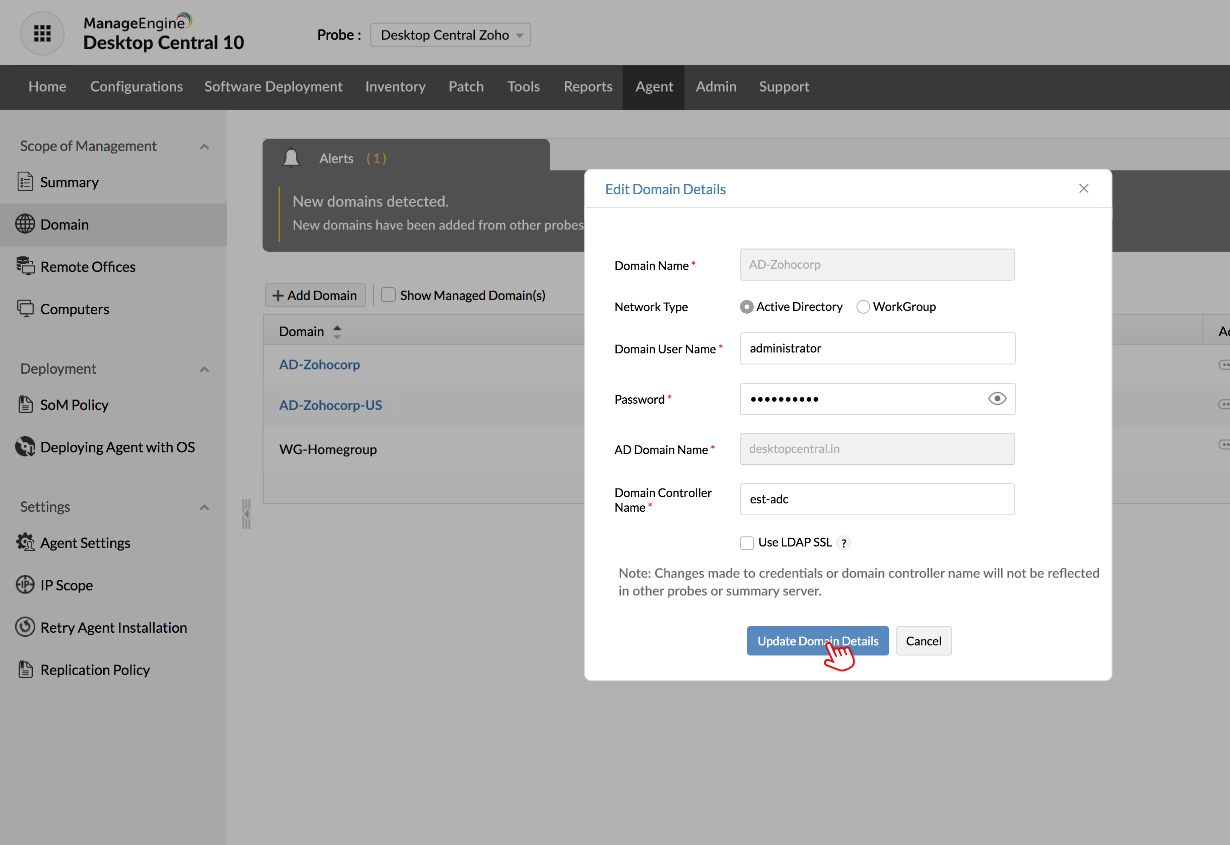
- Click Update Domain Details.
You have successfully created and configured credentials for a domain.
Configure Agent Settings
Endpoint Central's agent is a light-weight, non-intrusive application that resides on the computers that need to be managed. The agent settings can be configured in the Summary Server admin view. The configured settings will apply to all the probes and from there they are sent to all agents of the network.
Agent General Settings
- Login as Summary Server Administrator.
- Navigate to Admin -> Scope of Management Settings -> Agent Settings.
- The General Settings tab is selected by default. You can specify the following from here:
- Server IP Address: The IP Address of the computer where Endpoint Central server is installed is displayed here. The agents residing in the client computers communicate to the Endpoint Central server using this IP Address. Endpoint Central automatically detects the server IP Address whenever Endpoint Central Server is started. If you wish to automatically detect and save the IP Address, select the Automatically detect and save the IP Address change option. You can also enter the DNS name of the Server.
-
Enable Secured Communication: Select this option, if the communication between the Agent and the Endpoint Central Server should be secured (HTTPS)
-
Enable Checksum Validation: Select this option to verify the patch/software binaries downloaded from Endpoint Central server using the Checksum Validation (md5 algorithm)". If the checksum fails, then the installation will be aborted.
-
Restrict Users from Uninstalling Agents from Control Panel: Selecting this option will ensure that users do not uninstall the Endpoint Central Agents from their computer.
- Restricting Users from Stopping Endpoint Central Agent service: Choosing this option will restrict the users from manually stopping the Endpoint Central agent service. However, administrator can stop the Endpoint Central agent service by following the steps mentioned below:
- Click Tools on Endpoint Central server
- Choose System Manager
- Select the computer, on which you wanted to stop the service and click Manage
- Select the service "ManageEngine Endpoint Central - Agent", under Services tab
- Under Actions, click stop to stop the service.
- Perform Patch Scanning: Select this option if patch scanning has to be initiated immediately after the agent installation. If this option is not selected, patch scanning will only happen when it is scheduled or when On Demand scanning is initiated.
- Perform Inventory Scanning: Select this option if Inventory Scanning has to be initiated immediately after the agent installation. If this option is not selected, Inventory Scanning will only happen when it is scheduled or when On Demand scanning is initiated.
- Enable Firewall Settings : Endpoint Central requires the Windows Firewall running in the client computers to be configured for using all its features. Select this option to configure the firewall for enabling Remote Administration, DCOM, File and Printer Sharing, and Simple File Sharing in Windows XP.
- Enable Wake On LAN Settings: Select this option to enable wake on LAN feature in client computers to turn the computer on before deploying important configurations.
- Click Save Changes.
Agent Tray Icon Settings
Endpoint Central provides an option to display the Agent Icon in the System Tray of all the managed computers. The users can perform the following actions using the system tray:
- Initiate Patch Scanning
- Initiate Inventory Scanning
- Pull and apply configurations that are available to them
- Self-Service Portal
- Launch ServiceDesk Plus
- Send requests to Help Desk for specific needs.
- When User Logon Reports is enabled, the user will be able to view his/her login history.
To configure the Tray icon settings, follow the steps below:
- Navigate to Admin->Agent Settings under SoM Settings.
- Select the Agent Tray Icon tab and specify whether to display the icon in the system tray of the managed computers. When choosing this option, you can choose the following:
- Show Patch, Inventory, and Configuration Menu
- Show Last Logon Details
- Show Information Balloons While Processing Configurations, Patch Scanning and Inventory Scanning
- Click Save Changes.
Probe Administrator View
To ensure a smooth workflow, all the functionalities have to be configured at every specific probe as different probes may have different requirements. The functionalities that can be performed by the probe administrator :
Add Computers
To add computers, follow the steps given below:
- Login as probe administrator and choose to probe for which remote office is to be configured.
- Click the Admin tab.
- Under SoM Settings, click on Scope of Management.
- Click Add Computers.
- The Add Computers page will have the list of discovered domains and Workgroups.
- When no domains are discovered, use the Add Domain button and specify the credentials to add the domain/workgroup. Once the domain is added, all the computers belonging to the domain will be listed.
- Another way of adding domain/workgroup would be -
- Navigate to the Admin tab --> Global Settings -->Domain --> Add Domain and specify the credentials of the domain/workgroup.
- Click Add computers against a specific domain or workgroup under the Actions column for adding computers.
- Before adding the computers from the discovered domains, you need to specify the credentials that have administrative privileges in all the computers that are being managed by Endpoint Central. To specify the credentials, follow the steps given below:
- Click Edit against a specific domain or workgroup.
- Select either of the following network types:
- Active directory: Specify a domain user who has administrative privileges in all the computers that are managed using Endpoint Central. Enter the domain name as specified in the Active Directory and the name of the domain controller.
- Workgroup: Specify a local username and password with administrative privileges in all the computers that are managed by Endpoint Central.
- Click Update Domain Details.
- Select the computers that you want to manage using Endpoint Central and click Next.
- Note: Alternatively, you can specify the names of computers and add them manually. All computers get added to the Selected Computers list.
- Click on Install agents to install the Endpoint Central agent in the selected computers immediately.
- Note: If you do not wish to install immediately, click on 'Add to SoM' and the computers would just be added. You will have to install the agents later.
You have added computers to manage using Endpoint Central.
Agent Management
Endpoint Central Agents have to be installed in the probe administrator view and Endpoint Central has the flexibility to install agents through several ways:
- Installing Agents from Endpoint Central Console
- Installing Agents Using Windows GPO (only for Windows)
- Installing Agents Manually
- Installing Agents using SOM Policy
- Installing Agents using SCCM
- Retry Agent Installation
- Uninstalling Agents
for further information, refer this link.
