Resources and Resource Groups
PAM360 allows you to add the critical machines from your environment into the solution to manage them efficiently. PAM360 classifies any critical asset whose user accounts and passwords are to be managed by PAM360 as a 'Resource'. A 'resource' can be any server, application, network device, or appliance in your environment that carries authentication credentials that need to be secured from external attacks and managed regularly. The term Account denotes the 'User Account' & 'Password' that are a part of a 'Resource'. PAM360 allows you to add all the accounts pertaining to the resources and manage them individually in the product.
A large enterprise organization's IT network typically contains multiple critical machines that have similar needs in terms of management. In this case, it is beneficial to group the machines together based on their individual need or criteria and oversee them together. PAM360 offers the resource group functionality to solve this challenge. A Resource Group in PAM360 denotes the group to which a particular resource belongs. For example, if you have some Windows 10 servers among several other Windows servers, you can group all the Windows 10 servers as a single resource group.
Once your PAM360 setup is complete, import users and user groups from your environment into the solution through various means such as manual addition, user addition using API, and via discovery. PAM360 offers multiple authentication methods to choose from, such as Active Directory, Microsoft Entra ID, LDAP, Radius authentication. In addition, there are several options available for SAML single sign-on and two-factor authentication as well.
The Resources tab in PAM360 serves as an expansive space in which you can view and manage all the resources owned by you and/or shared to you by other administrators, along with the related accounts, and their respective passwords. The Password Explorer tree in the Resource tab contains a variety of options that consolidate all your resources based on criteria such as the resource groups they are part of, how frequently they are accessed, and so on.
This document explores the wide range of operations you can perform from the Resource tab and covers the way in which you can utilize the powerful privileged account management features in PAM360 to their fullest. Click through the links below to get started with the Resources tab:
- Exploring the Resources Tab
- What is the Password Explorer Tree?
- What Can I Do from the Resources Tab?
- Resource Groups
- Possible Actions from the Resources Tab
1. Exploring the Resources Tab
Navigate to the Resources tab to get started with adding resources to PAM360. The Resources tab is broadly divided into three parts:
- A list view of all resources and accounts owned by you and/or shared to you.
- The Password Explorer on the left pane.
- The display area in the middle - The display area in the middle displays the list of resources under the specific category as and when you click from the Password Explorer.
The Password Explorer tree on the left pane displays an array of available resources arranged based on categories, such as All My Passwords, Owned and Managed, Favorites, and Recently Accessed. It also contains two other sections: Admin Actions and Groups. The section below explains each category in detail.
2. What is the Password Explorer Tree?
The Password Explorer tree organizes all the available resources in PAM360 and displays them under different categories. Click a category name to view the resources that are specific to the selected category. Read further to learn in detail about each category:
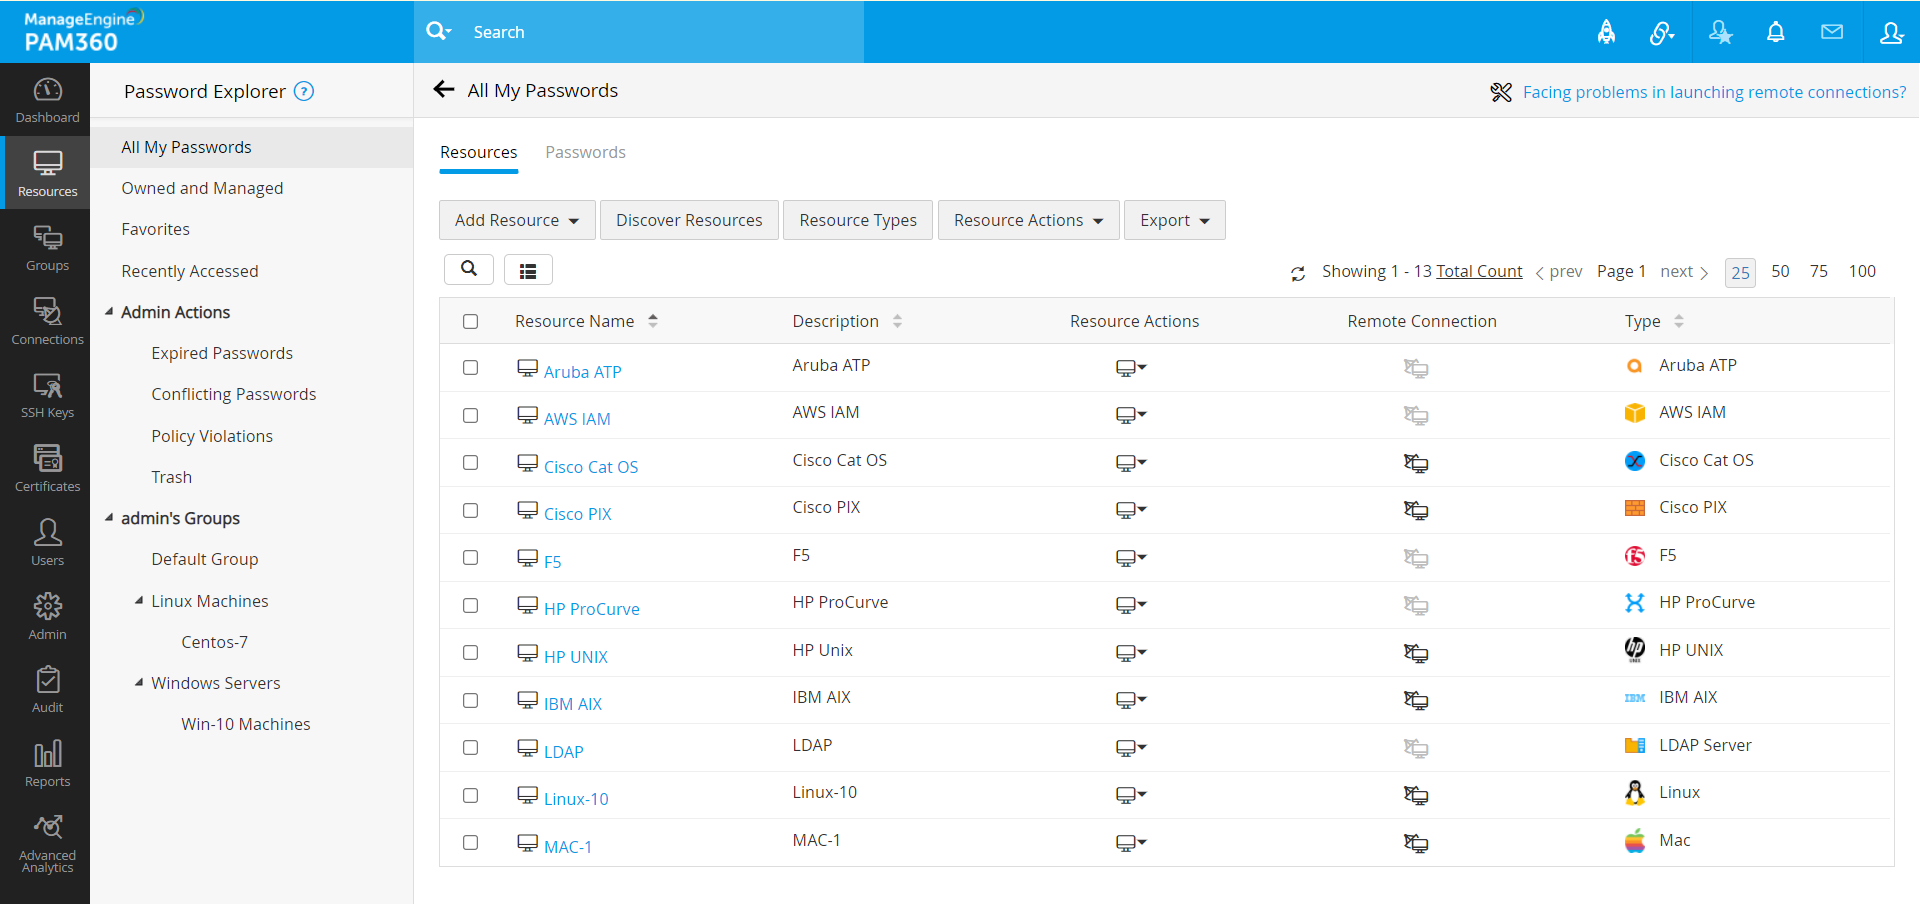
- All My Passwords - Click this option to display all the resources that are shared to you and available for your usage. Click the name of a resource to display all accounts corresponding to the selected resource. To search for a resource, click the search icon and enter the resource name, description, or the operating system (OS) type. There is a wide range of operations to be performed on the resources and passwords you have access to. They are explained in detail in this section below.
- Owned and Managed - This option is for users with administrator privileges. All resources owned by administrators and shared to them by other users are available here. Click the name of a resource to display all accounts corresponding to the selected resource. To search for a resource, click the search icon and enter the resource name, description, or the operating system (OS) type.
- Favorites - All accounts marked as a 'favorite' are available here. To mark an account as a favorite, go to the All My Passwords or Owned and Managed section, switch to the Passwords tab, and click the star icon (
 ) beside an account name. To search for a resource under the Favorites section, click the search icon and enter the resource name or the user account name.
 - Recently Accessed - All recently accessed resources are listed under this option for a quick reference. To search for a resource, click the search icon, and enter the resource name or the user account name.
- Admin Actions - This section comprises of the following categories: Expired Password, Conflicting Passwords, Policy Violations, Disabled Resources, and Trash. This section compiles all the accounts whose passwords might require your immediate attention; for example, you may want to perform a bulk password reset on all the expired passwords or restore a resource that was mistakenly deleted, from the trash. All the operations to be performed under Admin Actions are explained below in this section.
- Resources groups added by you - PAM360 allows you to maintain a hierarchical structure for resource groups in , i.e., the tree view. For example, let's assume that your organization contains departments that follow a hierarchy. You can group the resources belonging to the respective levels and create subgroups as required — PAM360 will display them in a tree view in this section to represent the hierarchy they follow in your organization.
3. What Can I do from the Resources Tab?
There is a wide range of actions you can perform over the resources and accounts displayed in the various sections of the Resource tab. The below links explain each of them in detail:
- Resource and Account-based operations
- Admin Actions
3.1 Resource and Account-based Operations
The Resource tab offers exhaustive options for adding and managing resources in PAM360. Each operation is listed below with a link that will explain in detail about how that particular feature works:
- Add resources into PAM360
- Manage resource types
- Manage resources
- Manage accounts and passwords
- Share resources and accounts
- Additional resource configurations
i. Add Resources into PAM360
Add your privileged resources such as servers and endpoints as resources in PAM360 to start managing their accounts and passwords. There are three ways in which you can add resources and accounts into PAM360: Manual addition, import from file, automatic discovery of resources and accounts. Click the respective links to learn about each topic in detail.
ii. Manage Resource Types
PAM360 supports a wide range of resource types by default. In addition to that, you can add as many custom resource types as you require. Click here to learn in detail about how to manage various resource types in PAM360.
iii. Manage Resources
PAM360 offers extensive options to manage the resources added to the repository. Listed below are the resource-based operations that you can perform in PAM360. Click each link to learn about the topic in detail.
iv. Manage Accounts and Passwords
There are different ways in which you can manage the accounts and passwords saved in the PAM360 repository. Some of the operations include viewing, editing, copying, moving accounts, changing passwords, and viewing password history. Click here to learn in detail about each operation.
v. Share Resources and Accounts
PAM360 offers an option to securely share your resources and accounts with other users and/or user groups. Click the links below to learn about each topic in detail.
vi. Additional Resource Configurations
PAM360 offers several additional resource configurations that you can use to enhance the security of the resources stored in PAM360 and to use them efficiently. Click the below links to learn about each topic in detail:
3.2 Admin Actions
The Admin Actions section of the Password Explorer tree provides a consolidated view of expired passwords, passwords that may be violating password policies set by the admin, disabled resources, and Trash. While the PAM360 Dashboard provides a global view of expired/conflicting passwords and policy violations, the Admin Actions section gives a concentrated view of only the passwords owned and managed by you. From this section, you can reset the passwords that are in violation, either selectively or in bulk. Admin Actions section also displays the disabled resources that were imported into PAM360 during an Active Directory/LDAP import. Any resource that was moved to trash during deletion will be visible under the Trash category in this section. Each category under Admin Actions is explained in detail below:
- Expired Passwords
- Conflicting Passwords
- Policy Violations
- Disabled Resources
- Trash
3.2.1 Expired Passwords
Passwords that are not reset within the maximum number of days specified in the password policy are considered to be expired.
Each password policy comes with a different Maximum Password Age in days; PAM360 flags any password that has not been renewed after this time period as expired passwords. This section lists all expired passwords of the accounts that are owned or managed by you.
3.2.2 Conflicting Passwords
Conflicting passwords arise when the password of an account stored in the PAM360 repository is not in sync with the password of the same account in the remote machine. Resetting the password of an account in PAM360 without applying the changes to the remote resource or vice versa leads to conflict in passwords. If left unchecked, out of sync passwords can lead to authentication failure and security issues. As a safety measure, PAM360 runs a periodic password integrity check that ensures that all passwords stored in PAM360 match the ones in the corresponding remote machines. Passwords that are found to be mismatched will be flagged and displayed in this section.
3.2.3 Policy Violations
Passwords that violate the password policies applied in PAM360 will be displayed in this section. By default, PAM360 has three password policies: Strong, Medium, Low — they all come with varying levels of complexity. You can also set your own custom password policies and apply that to your passwords. PAM360 runs a periodic check to ensure the complexity of the passwords match the complexity specified in the password policies chosen for them; any password that does not pass the check will be flagged and displayed here.
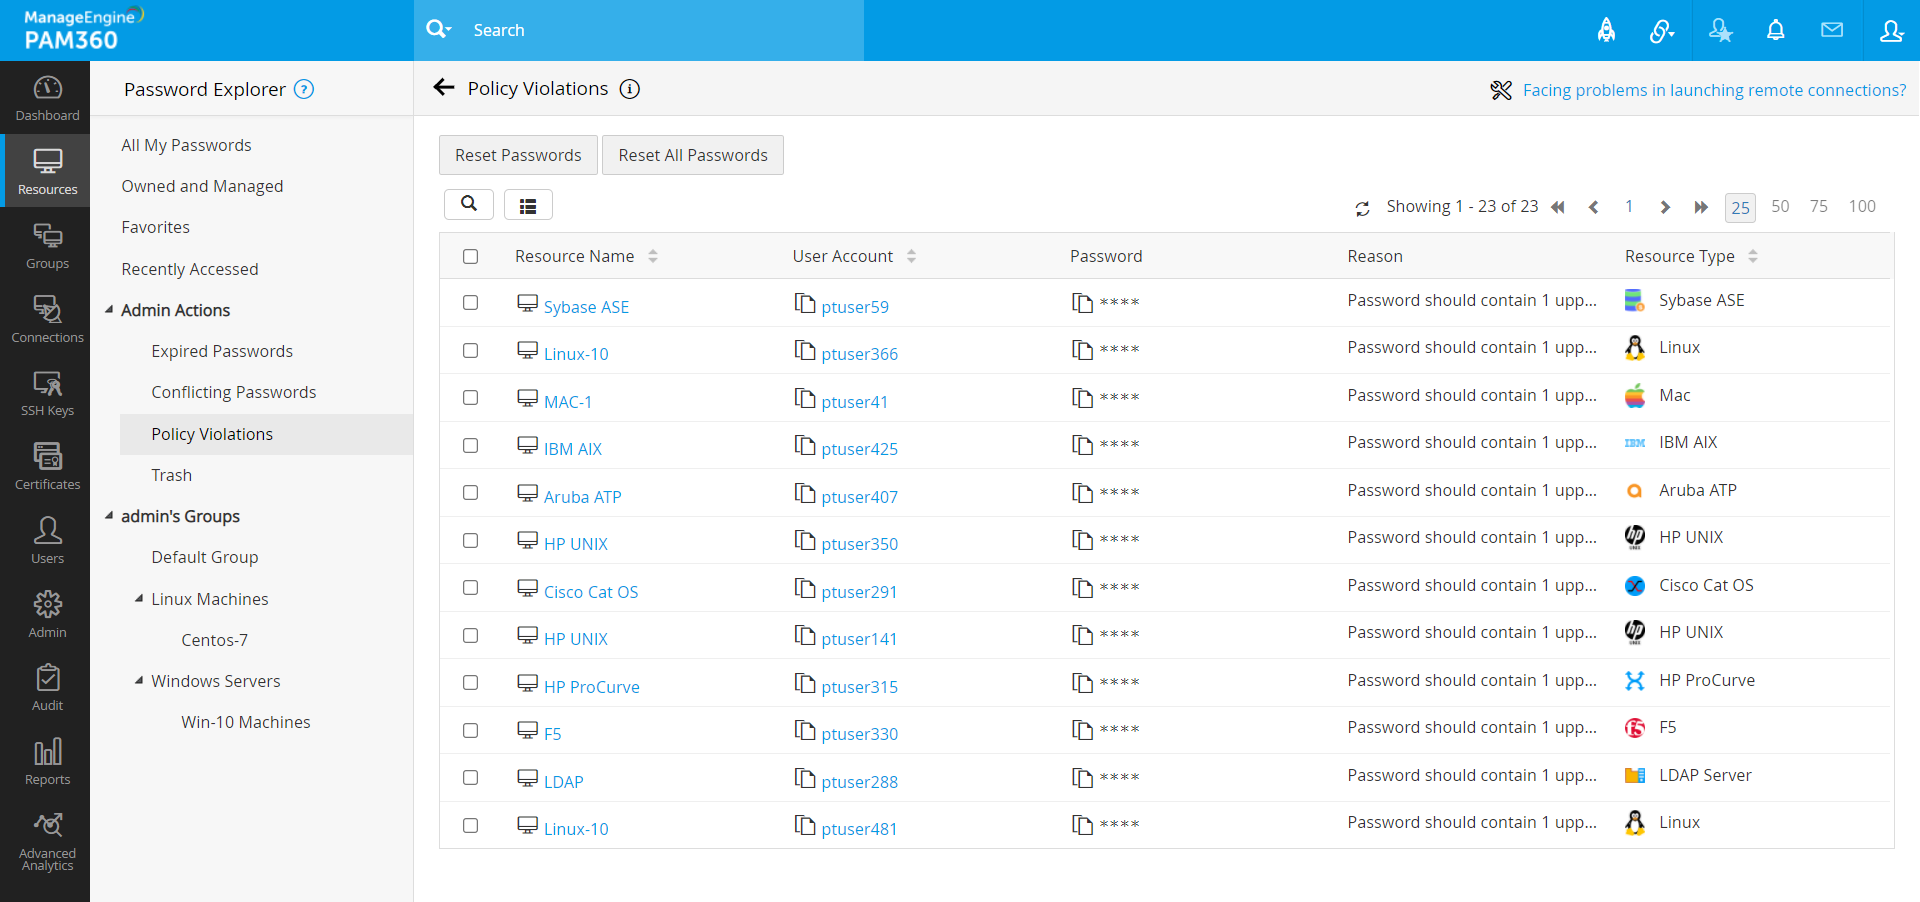
You can reset the passwords displayed in the above three sections using the password reset configuration settings provided by PAM360.
Password Reset Configuration
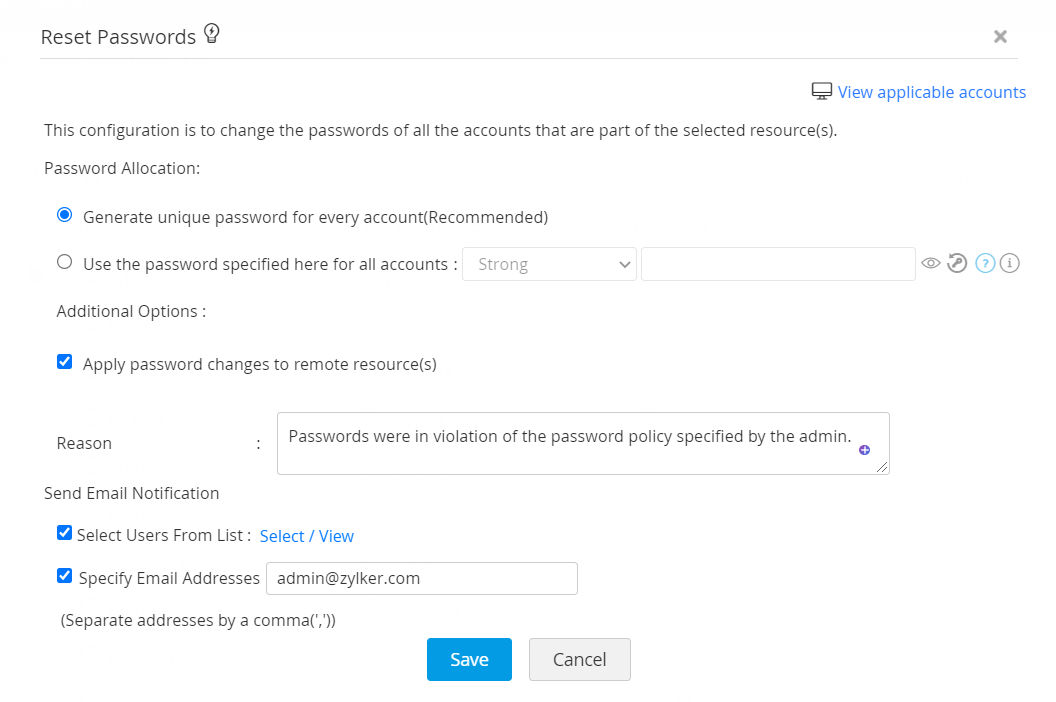
- To reset a selection of passwords, select the required passwords using the checkbox beside each one and click the Reset Passwords option at the top.
- In the pop-up that appears, you can either manually specify a password. This password will be applied to all selected accounts. Or, you can allow PAM360 to generate a unique password for each account.
- If you select the Apply password changes to remote resource(s) option, PAM360 will change the passwords of the remote resources after resetting passwords here. This operation will avoid a mismatch of passwords between the remote machine and the password reflecting in PAM360.
- There is also a provision to send an email notification about the password reset to others. You can either choose users from PAM360 to notify or specify email addresses to which you wish to send the notification. Click Save once you have chosen your preferred configurations.
- To reset all of the passwords under this category, simply click Reset All Passwords without selecting any password from the list below. This action will reset all expired passwords in bulk. The status of the password reset operation will be captured under Audit >> Resource Audit.
- Restore: To restore a resource from Trash, select the resource, and click Restore. The selected resource will be restored to the Resources tab.
- Delete: To delete resources from the Trash selectively, click the checkboxes beside the required resources, and click Delete.
- Empty Trash: To delete all resources from the Trash section, click the Empty Trash option. Please note that this action will only remove trashed resources that are owned by you.
- Static resource group
- Dynamic resource group
- Discovering Resources and Privileged Accounts
- Adding Resources Manually
- Importing Resources
- Storing Files
- Managing Resources
- Sharing Individual Resources
- Sharing Resources in Bulk
- Managing Accounts and Passwords
- Managing Resource Types
- Working with Passwords
- Password Reset
- Managing Resource Groups
- Nested Resource Groups
- Exporting Resource Groups
- IIS Web Config. Discovery
3.2.4 Disabled Resources
While importing resources from Active Directory/LDAP into PAM360, you can choose to include disabled machines also. After the import is done, all the disabled resources will be consolidated under this section.
3.2.5 Trash
While deleting resources in PAM360, you can choose to delete them permanently or move them to the Trash. In this section, you can view all the resources that are moved to trash during deletion.
Click here to learn more about deleting resources.
4. Resource Groups
The Resource Groups are accessible from the Resources tab. The Password Explorer displays all the resource groups and the corresponding subgroups that you create. Within the resource groups, you can perform all resource and account related operations explained in this section. To search for a resource, enter the resource name, DNS name, or the operating system (OS) type. PAM360 allows you to group Resources of similar attributes for easier management.
You can create two types of Resource groups:
In the case of a static resource group, you need to mark individual resources that are to be grouped together and create a resource group with a relevant name and description. You can manually add resources to the group at any point in time.
In the case of a dynamic resource group, you need to specify a set of criteria while creating the group. Whenever a new resource is added to PAM360, if it fits the criteria specified for a particular group, the resource is automatically added to the group. For example, let's say you create a group CV-WinDom-01 for the resource type Windows Domain. In this case, all Windows Domain resources added at any point of time after the creation of this group will automatically be a part of CV-WinDom-01.
Similar to how resources and accounts can be shared, resources groups can be shared with other users and user groups as well. However, please note that whenever resources get added or deleted from a group, it affects the password access shared through the group. That is, users with whom a particular resource group has been shared can see passwords of only the resources that are part of the group at that point in time.
To learn more about how to create and manage resource groups in PAM360, click here.
5. Possible Actions from the Resources Tab
The below links take you to the detailed documents that will help you discover, add, and manage various resources types, create resource groups for efficient management of the resources, and gain complete control over the passwords of the resources. Click through each link below to learn about the respective feature.