Configuring PostgreSQL Cluster as the Backend Database
PostgreSQL is an advanced open-source RDBMS system with unique features, like fault-tolerant capabilities, scalability, stability, etc., designed to handle huge workloads. PAM360 already employs PostgreSQL as its default database, which comes bundled with the product.
Now, to increase the scalability on a large scale and improve the operations and functionality of the application, PAM360 allows users to configure the PostgreSQL cluster as a standalone external backend database.
At the end of this document, you will have learned about configuring the PostgreSQL cluster as the backend database.
Steps Required
- Download and install PAM360 on the preferred machine/server.
Note: Do not start the PAM360 service after the installation.
- Download and install PostgreSQL.
- Create a database cluster in the PostgreSQL provided with the database owner's permission.
- Following the database cluster creation, ensure that the extension 'pgcrypto' is available in the extension drop-down. If there is no such available extension, create it using the command - CREATE EXTENSION pgcrypto;
- Navigate to <PostgreSQL_Installation_folder>pgsql_installation\data and open the file pg_hba.conf:
- Add an entry at the end with the IP address of the machine/server on which the PAM360 is running.
E.g., host all <user name> <ip address>/32 md5
Note: The above step applies only to users who use an external PostgreSQL enterprise database as their backend database. For users with cloud-based databases, the process will be performed in an automated process.
- Add an entry at the end with the IP address of the machine/server on which the PAM360 is running.
- Navigate to <PostgreSQL_Installation_folder>pgsql_installation\data in Windows or <PostgreSQL_Installation_folder>pgsql_installation\main in Linux and open the file postgresql.conf:
- Search for listen_addresses and provide the IP address of the server where PAM360 is running.
- Restart the PostgreSQL server.
- Navigate to <PAM360_Installation_folder>\conf and open the file customer-config.xml:
- Search for startdbserver= true and change its value to false.
- Now, save and close the file customer-config.xml.
- Navigate to
<PAM360_Installation_folder>\conf and open the file database_param.conf.
- Replace localhost with the listener name of the server where the PostgreSQL database cluster is running.
- Change the port number to the actual port number of the PostgreSQL cluster in the database. By default, the initial port number for the PostgreSQL will be 5432.
- Update the username and password.
- Update the database name as provided while creating the cluster.
- Update the db.password.encrypted to false.
- Now, save and close the file database_param.conf.
Notes: The password given here will be in plain text at that instance and will be encrypted from the next consequent occurrence.
- Download the root CA certificate of the PostgreSQL database cluster.
If you are unaware of creating an SSL for the PostgreSQL database, follow the steps below to generate the required SSL certificates and validate the SSL connection.
- Now, import the root CA certificate of the file PostgreSQL database cluster into PAM360.
- Start the PAM360 service.
Now, you have successfully configured the PostgreSQL cluster as the backend database.
SSL Generation for PostgreSQL Cluster
An SSL connection is required for a secured connection between the PostgreSQL database cluster and the PAM360 application. To establish the SSL connection, the root CA of the PostgreSQL database cluster is required.
The following steps educate you on creating the required SSL certificates for the PostgreSQL database cluster and verify the SSL configuration of the PostgreSQL database cluster.
a. Creating a Self-Signed Root CA for the PostgreSQL Database Cluster
- Navigate to <PostgreSQL Installation Directory>\data where the certificates are to be created and open the command prompt as an administrator to proceed with the following steps to create an SSL root CA for the PostgreSQL database cluster.
- Execute the command - openssl genrsa -passout pass:1111 -des3 -out rootca.key 4096
(where 'pass:1111' is the PEM pass phrase and 'rootca.key' is the trust certificate key)
- Execute the command - openssl req -passin pass:1111 -new -x509 -days 365 -key rootca.key -out rootca.crt
- Enter the required certificate details accordingly to create a root certificate. E.g, The common name as the server name and the SAN name with the server IP address.
- Execute the command - openssl genrsa -passout pass:1111 -des3 -out server.key 4096
(where 'pass:1111' is the PEM pass phrase and 'server.key' is the trust certificate key)
- Execute the command - openssl req -passin pass:1111 -new -key server.key -out server.csr
- Enter the required certificate details accordingly to create a server certificate. E.g, The common name as the server name and the SAN name with the server IP address.
- Execute the command - openssl x509 -req -passin pass:1111 -days 365 -in server.csr -CA rootca.crt -CAkey rootca.key -set_serial 01 -out server.crt
Notes:
1.
Upon execution of the above command, the server.csr will be signed with the rootca.crt. To trust the certificates issued, add the rootca.crt to the respective trust store on the server.
2.
You can also name the private keys, certificates and csr on your own as needed.
Note: If you are about to use a wildcard certificate for the PostgreSQL database, place the wildcard certificate along with the respective private key file in the <PostgreSQL Installation Directory>\data directory path.
b. Configuring the PostgreSQL Database Cluster to use the SSL
- Navigate to <PostgreSQL Installation Directory>\data and open the postgresql.conf file with the administrator privilege.
- Look out for the listen_addresses under the connection settings and edit/verify the parameter listen_addresses, as this allows connection from the external hosts.
- Search for the SSL section in the postgresql.conf and uncomment all the SSL parameters.
- Now, edit the SSL parameters with our certificate information as shown below.
- Now, restart the PostgreSQL database for the changes to get in effect.
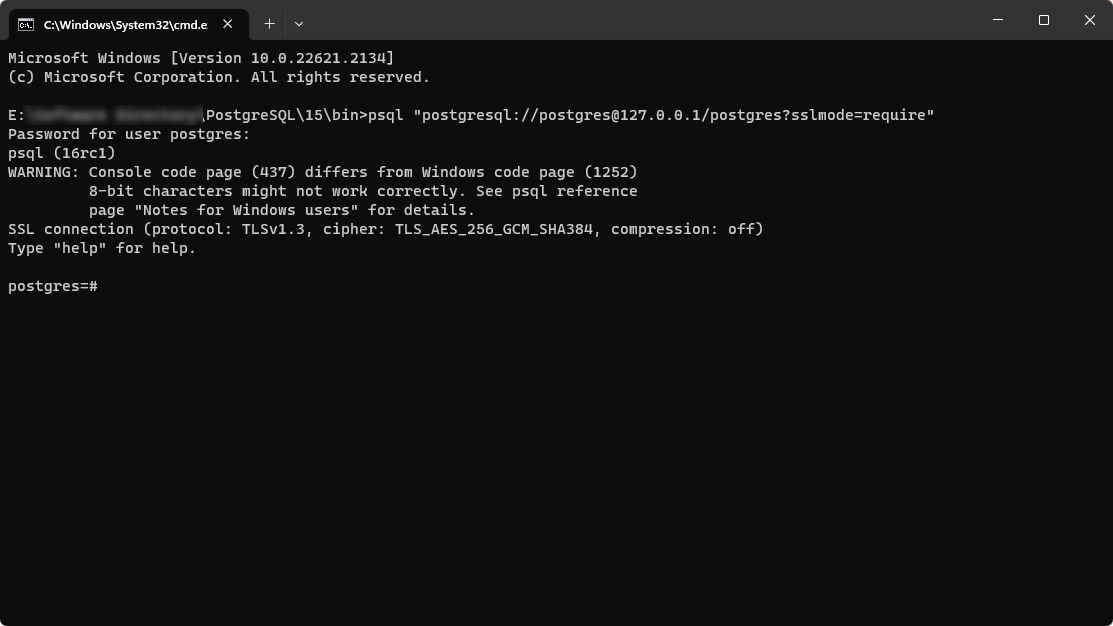
- To validate the SSL connection configuration, navigate to <PostgreSQL Installation Directory>\bin and open the command prompt with the administrator privilege.
- Execute the command - psql "postgresql://username@hostname/dbname?sslmode=require" Replace username, hostname, and dbname with your PostgreSQL cluster details.
For example, psql "postgresql://postgres@127.0.0.1/postgres?sslmode=require"
- Now, enter the PostgreSQL database password that you have entered during the PostgreSQL database installation.
- Upon entering the password, you will be prompted with the below message for the successful SSL connection.
- Now, navigate to <PostgreSQL Installation Directory>\data and use the rootca.cert to import it into PAM360.
listen_addresses = '*'
ssl = on
ssl_ca_file = 'rootca.crt'
ssl_cert_file = 'server.crt'
ssl_crl_file = ''
ssl_crl_dir = ''
ssl_key_file = 'server.key'
ssl_ciphers = 'HIGH:MEDIUM:+3DES:!aNULL' # allowed SSL ciphers
ssl_prefer_server_ciphers = on
ssl_ecdh_curve = 'prime256v1'
ssl_min_protocol_version = 'TLSv1.2'
ssl_max_protocol_version = ''
ssl_dh_params_file = ''
ssl_passphrase_command = ''
ssl_passphrase_command_supports_reload = off
Note: If you are using a wildcard certificate for the PostgreSQL database, update the ssl_ca_file parameter with no attribute (ssl_ca_file='').