Deploying SSL Certificates to Target Web Servers
In general, SSL certificates procured from Certificate Authorities (CAs) are stored in a repository and then manually deployed on appropriate target systems. PAM360 deploys the certificates from the repository on the correct target systems automatically. You can use PAM360 to deploy the certificates on the various systems individually, or in bulk, based on your requirements. Also, you can use the Key Manager Plus agent to deploy certificates on servers that reside in demilitarized zones outside of the domain where the PAM360 server is present.
- Steps to Deploy Certificates on Different Target Systems
1.1 Deploying certificates to a Windows server
1.2 Deploying certificates to MS Certificate store
1.3 Deploying certificates to Internet Information Services (IIS)
1.4 IIS Binding
1.5 Deploying certificates to a Linux server
1.6 Deploying Certificates to a Browser
1.7 Deploying Certificates to ManageEngine MDM
1. Steps to Deploy Certificates on Different Target Systems
Using PAM360, you can directly deploy selected SSL certificates onto target servers. To deploy an SSL certificate to a target server:
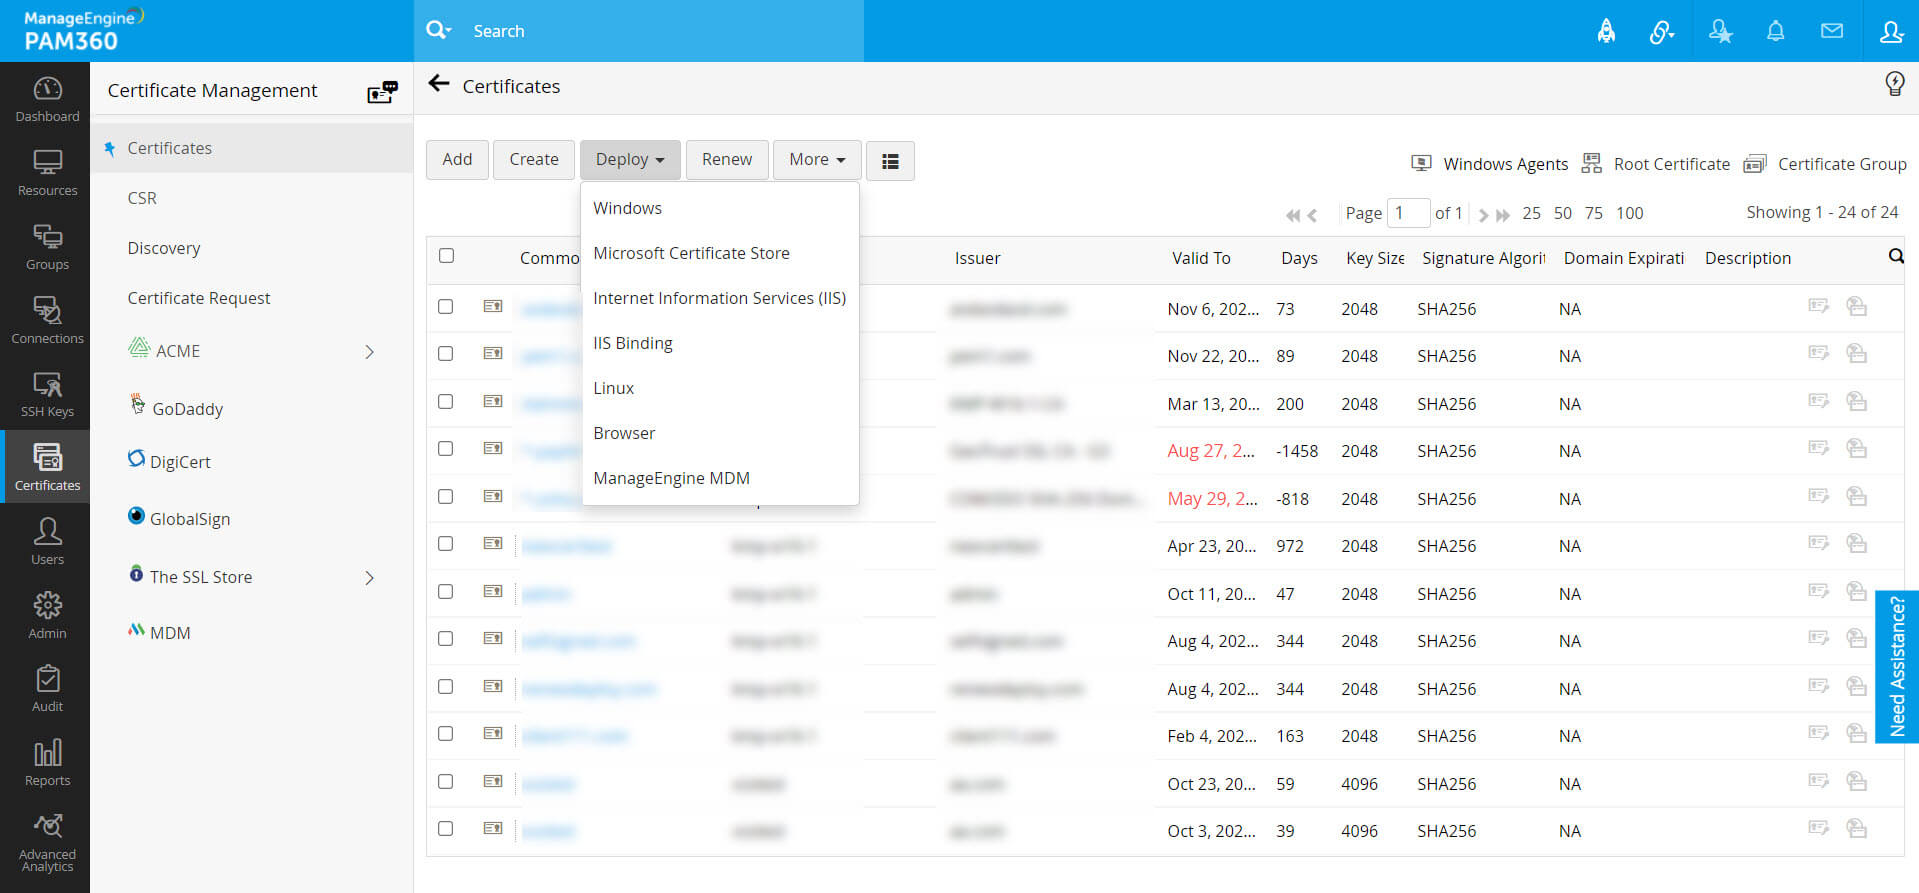
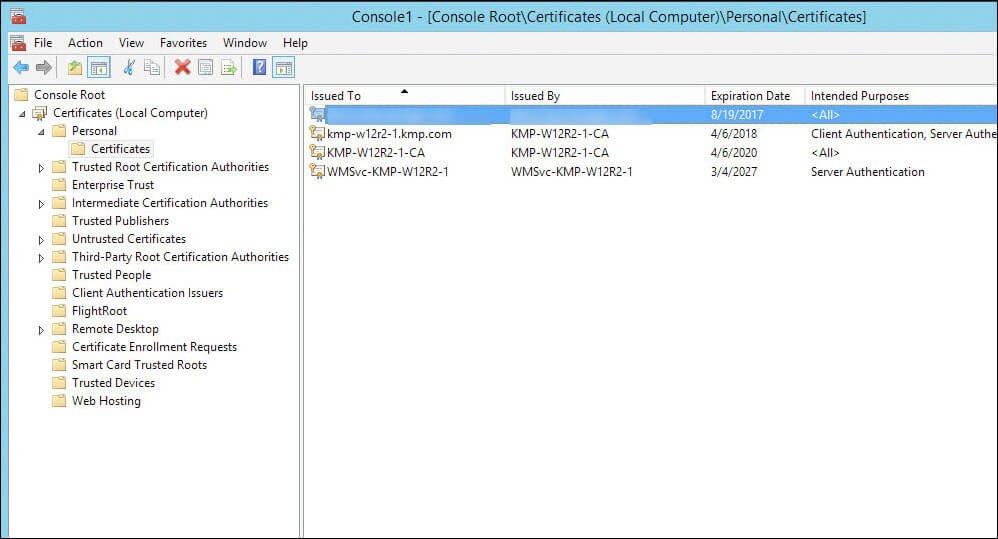
- Navigate to Certificates >> Certificates.
- Select the certificates that you want to deploy to target servers by clicking on the check boxes beside them.
- Click Deploy.
- In the Certificate Deployment window that opens, select the server type and provide the required details. The certificates are deployed to the specified servers in the specified path.
1.1 Deploying Certificates to a Windows Server
Notes:
1. For deploying certificates on Windows systems, MS Certificate Store and Internet Information Services (IIS), use your domain administrator account as the service login account of PAM360.
2. If you are using a domain service account to run PAM360, ensure you already have it configured in your local admin group.
- To deploy certificates on Windows server, choose the server type as Windows.
- Select the Deployment Type as Single, Multiple (servers) or Agent as per your need.
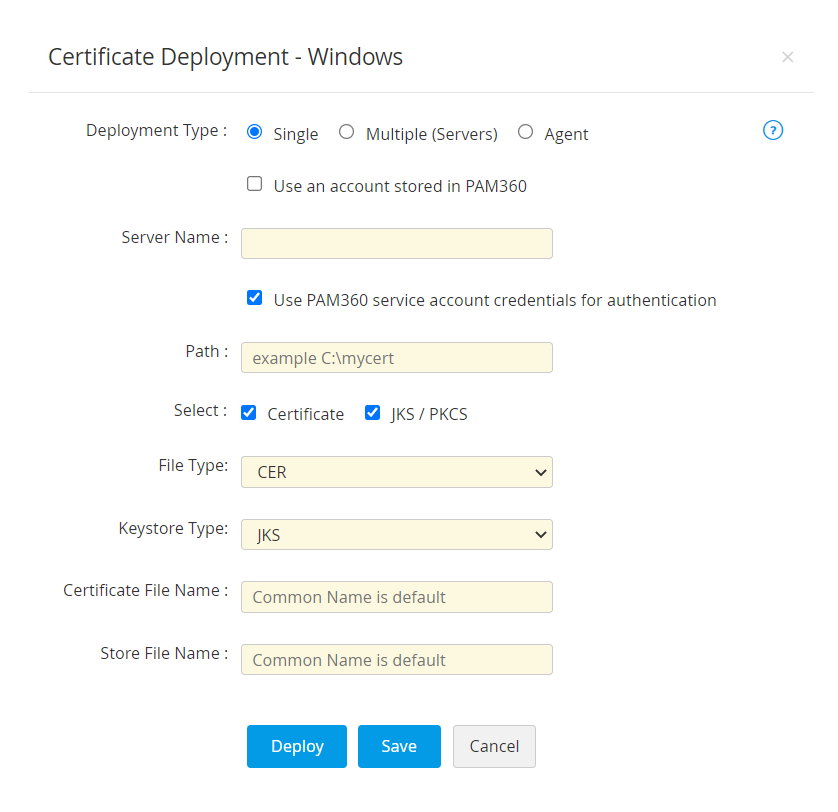
- For single server deployment, provide the required details: Server Name, User Name, Password, Path, File Type and Certificate File Name. you can optionally enable Certificate to choose the File Type and mention the Certificate File Name or/and enable JKS/PKCS to choose the Keystore Type and mention the Store File Name.
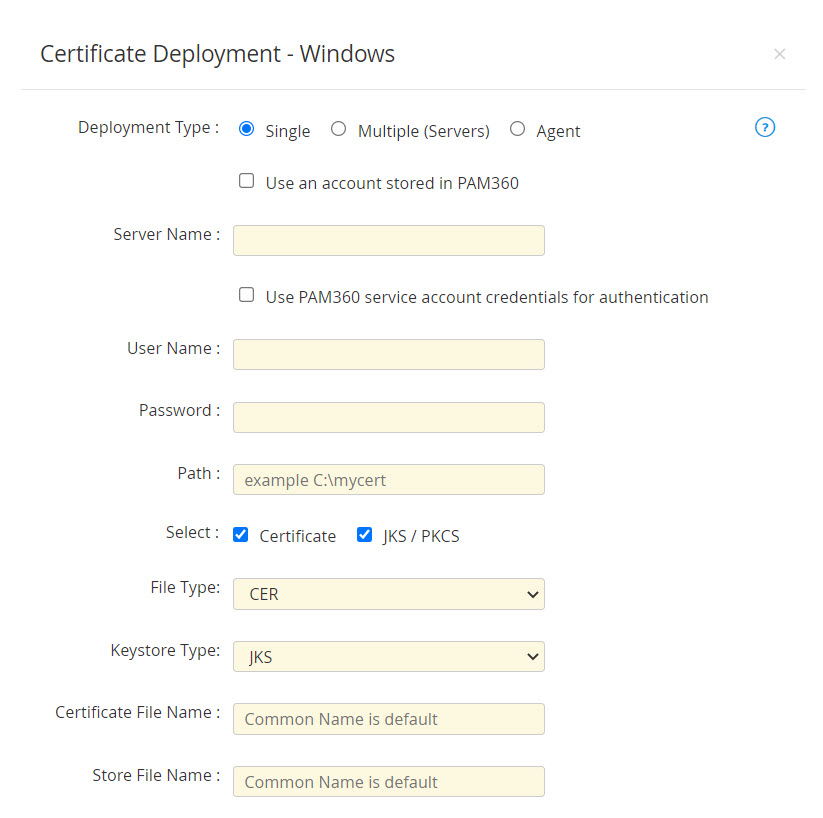
- If you select the checkbox Use PAM360 service account credentials for authentication, you need not provide the username and password separately, as the service account credentials used for PAM360 will be used here too.
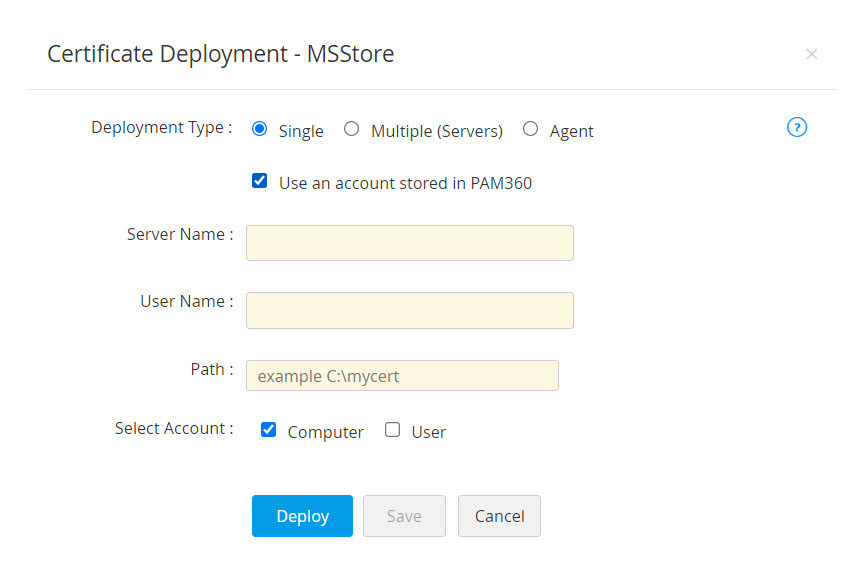
- If you select the checkbox Use an account stored in PAM360, you need not provide the password as PAM360 will take the user account details directly from the database.
- For certificate deployment on Multiple servers, upload a .csv file comprising the following details: Server Name, User Name, Password, Path, Certificate file name (optional), Keystore File Name (optional) and File Type. You can optionally enable Certificate to choose the File Type or/and enable JKS/PKCS to choose the Keystore Type.
- If you choose the Deployment Type as Agent, choose the host name of the PAM360 agent from the Select Agent drop-down, enter the destination file path in the agent machine. If a destination path is not mentioned, the agent installation path will be taken as default. You can optionally enable Certificate to choose the File Type and mention the Certificate File Name or/and enable JKS/PKCS to choose the Keystore Type and mention the Store File Name.
- Click Save to save the details.
- For single server deployment, provide the required details: Server Name, User Name, Password, Path, File Type and Certificate File Name. you can optionally enable Certificate to choose the File Type and mention the Certificate File Name or/and enable JKS/PKCS to choose the Keystore Type and mention the Store File Name.
- Now, click Deploy.
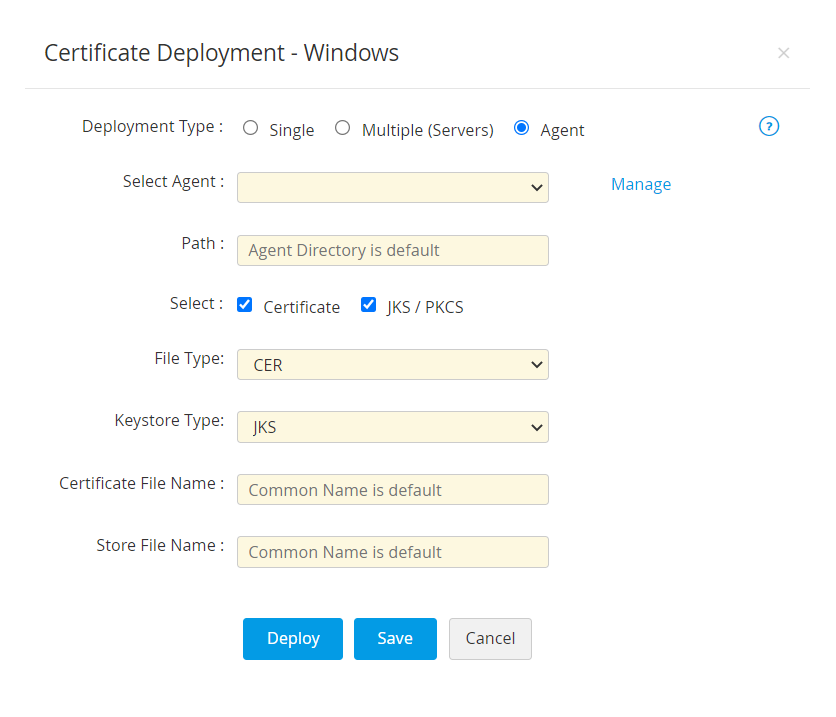
The certificate is deployed to the specified server/agent in the specified path.
Note: For file-based deployment, if the Certificate and Keystore file names are not provided, or if multiple certificates are selected for deployment, the Common Name will be used as the file name.
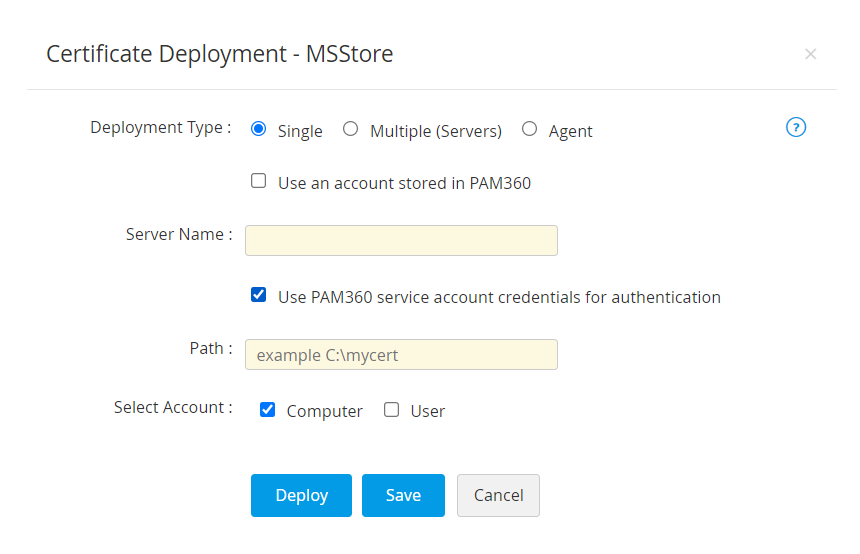
1.2 Deploying Certificates to MS Certificate Store
- To deploy certificates to MS Certificate store, choose the server type as Microsoft Certificate Store.
- Select the Deployment Type as Single, Multiple or Agent as per your need.
- For Single deployment, provide the required details: Server Name, User Name, Password, Path.
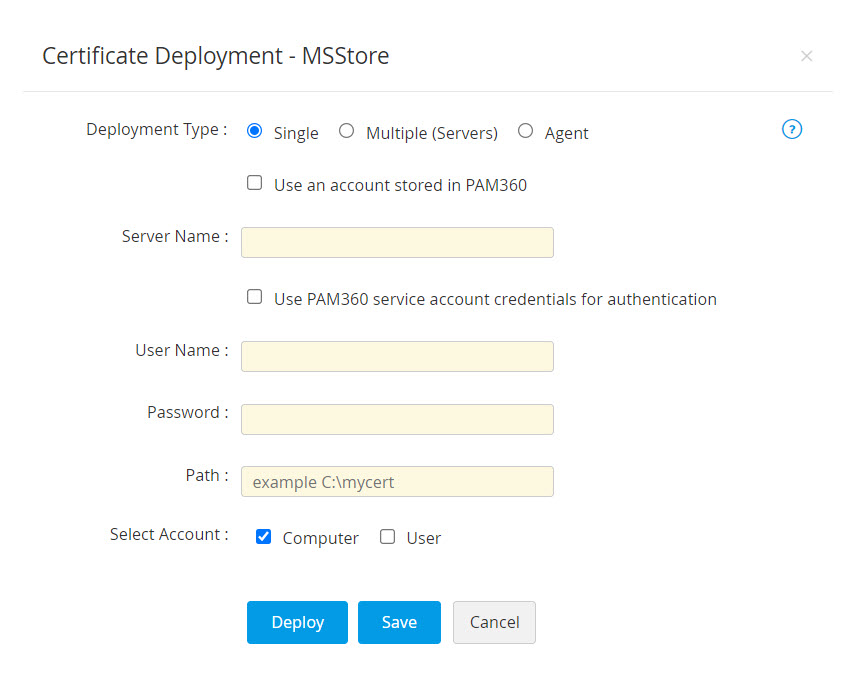
- If you select the checkbox Use an account stored in PAM360, you need not provide the password as PAM360 will take the user account details directly from the database.
- If you select the checkbox Use PAM360 service account credentials for authentication, you need not provide the username and password as PAM360 will take the user account details directly from the database.
- For certificate deployment on Multiple servers, upload a .csv file comprising the following details: Server Name, User Name, Password, Path.
- Select Computer and/or User account to deploy the certificate to the selected account.
Note: For Agent deployment, the latest version of PAM360 agent(5900) should run in the user account to which the certificates are to be deployed.
- If you choose the Deployment Type as Agent, choose the host name of the PAM360 agent from the Select Agent drop-down.
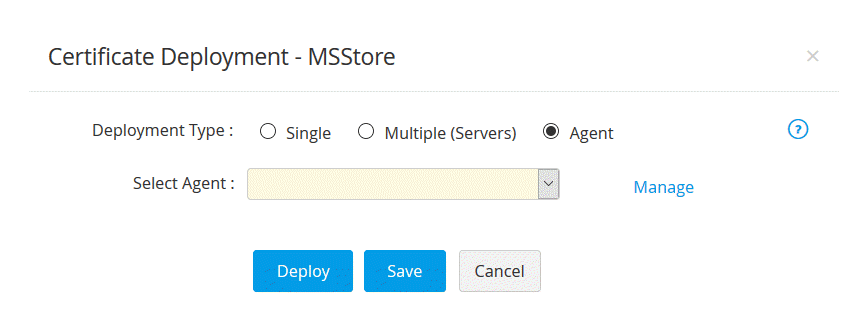
- Now, select Enable PrivateKey Export from MS Store after deployment to export private key from the certificate store.
- Click Save to save the agent details. After providing the details, click Deploy.
The selected certificates are deployed to Personal Certificates.
- For Single deployment, provide the required details: Server Name, User Name, Password, Path.
1.3 Deploying Certificates to Internet Information Services (IIS)
Follow the below steps to deploy a certificate on the IIS server. However, this procedure will only deploy the certificate to the server; IIS binding must be done separately.
- To deploy certificates to Internet Information Services (IIS), choose the server type as IIS.
- Select the Deployment Type as Single, Multiple or Agent as per your need.
- For Single deployment, provide the required details: Server Name, User Name, Password, Path.
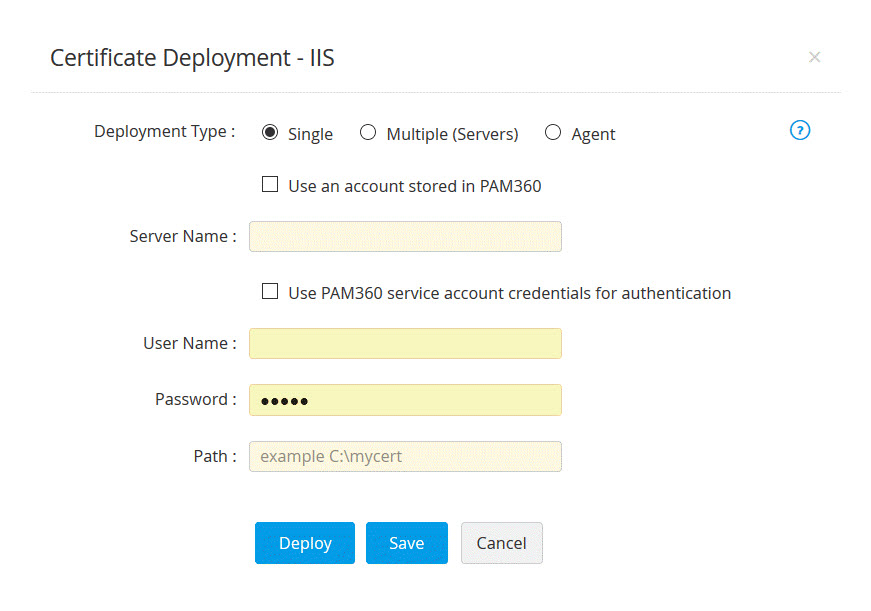
- If you select the checkbox Use an account stored in PAM360, you need not provide the password as PAM360 will take the user account details directly from the database.
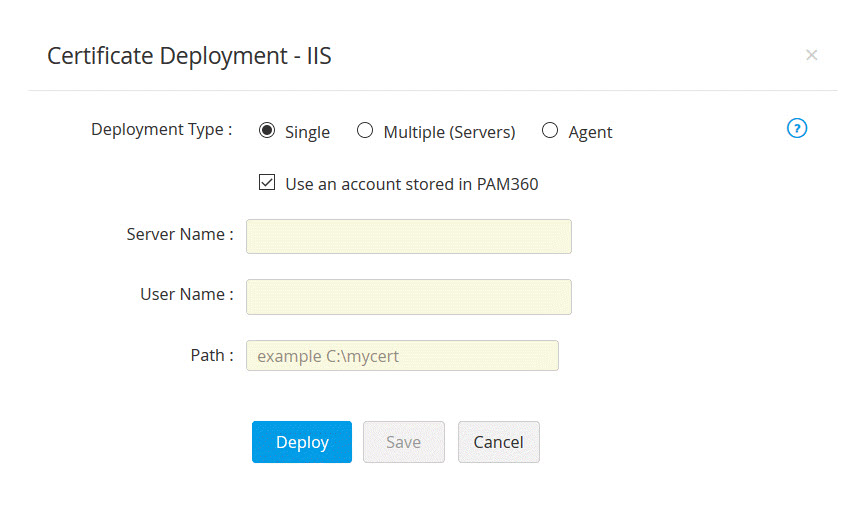
- If you select the checkbox Use PAM360 service account credentials for authentication, you need not provide the username and password as PAM360 will take the user account details directly from the database.
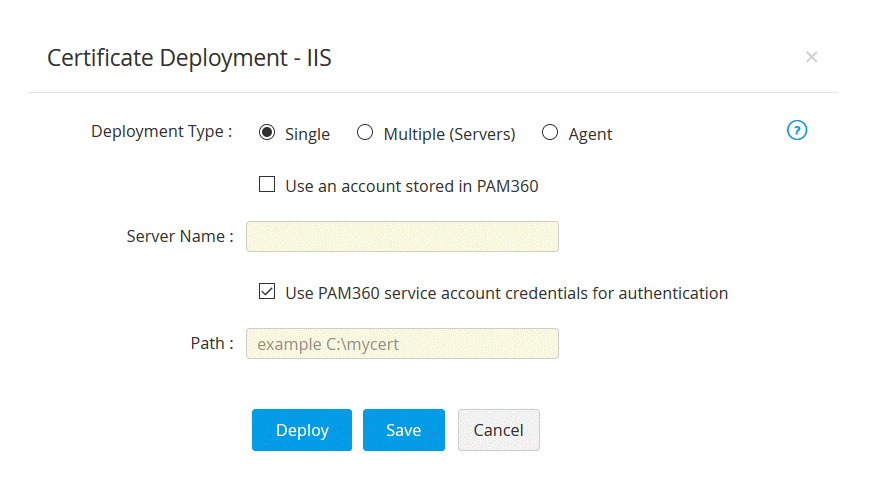
- For certificate deployment on Multiple servers, upload a .csv file comprising the following details: Server Name, User Name, Password, Path.
- If you choose the Deployment Type as Agent, choose the host name of the PAM360 agent from the Select Agent drop-down and click Save to save the agent details.
- After providing the details, click Deploy.
- For Single deployment, provide the required details: Server Name, User Name, Password, Path.
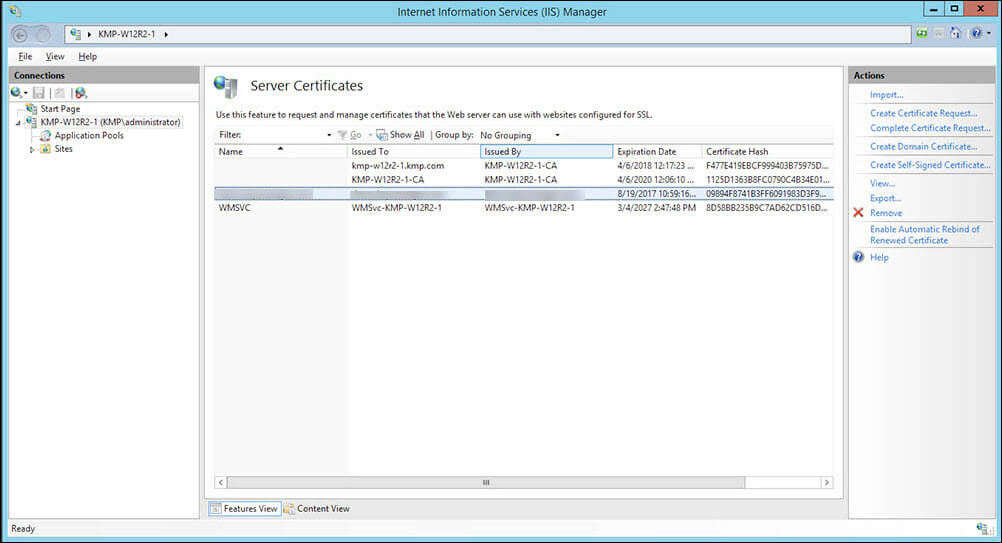
The certificate(s) are deployed to Server certificates of the specified server(s).
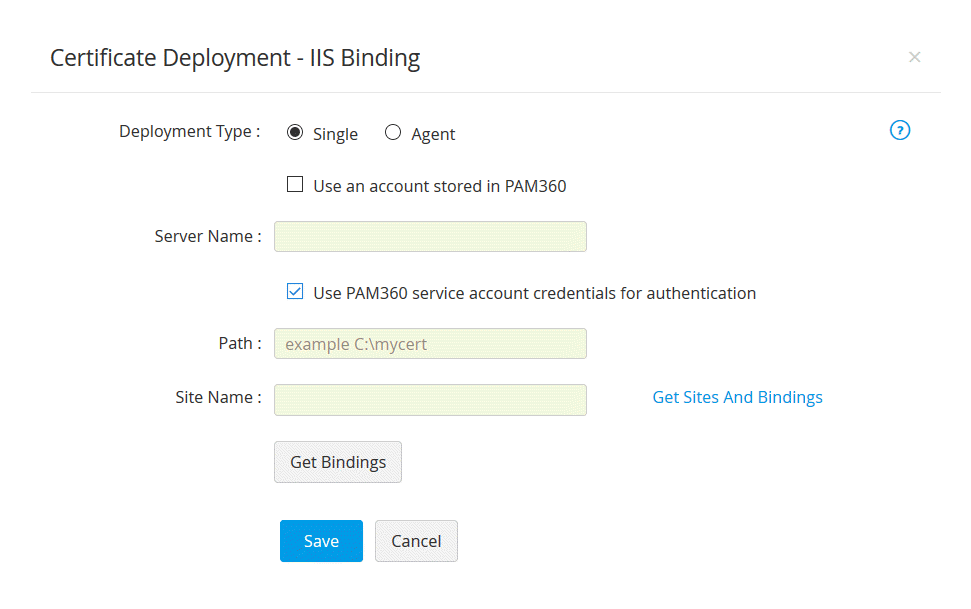
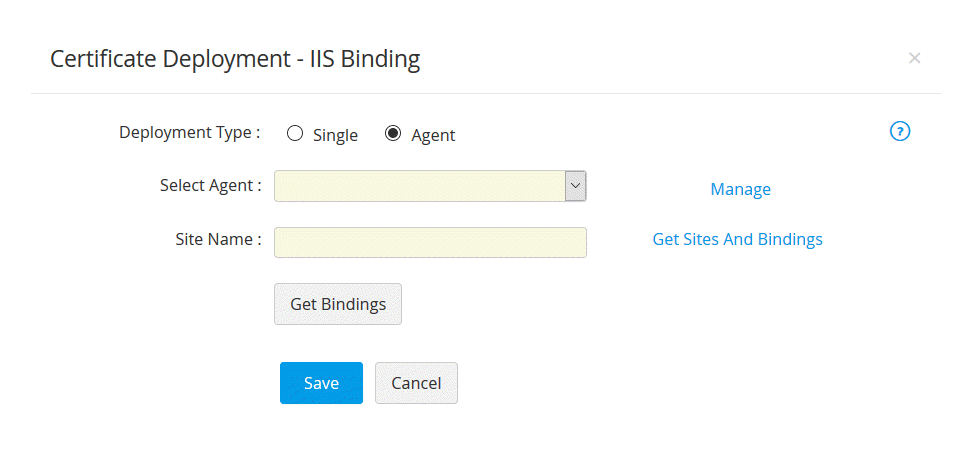
1.4 IIS Binding
Follow the below steps to deploy a certificate to the IIS server and bind the certificate to a site running in that server.
Note: IIS Binding for the Deployment Type Single works only if the IIS server and PAM360 are in the same domain, which has .Net Framework version 4 or above enabled. However, if an IIS Server resides in a demilitarized zone, choose the Deployment Type as Agent and proceed with the steps for the same given below.

- To deploy certificates on a Microsoft IIS server and perform IIS binding, choose the server type as IIS Binding.
- Select the Deployment Type as Single or Agent as per your need.
- If you choose the deployment type as Single, enter the required details: Server Name, User Name, Password, Path, Site Name.

- Specify the name of a valid IIS server to which the certificate needs to be deployed, and provide the user account credentials.
- Specify a path in the server where the certificate must be placed.
- If you select the checkbox Use an account stored in PAM360, you need not provide the password as PAM360 will take the user account details directly from the database.
- If you select the checkbox Use PAM360 service account credentials for authentication, you need not provide the username and password as PAM360 will take the user account details directly from the database.
- If you choose the Deployment Type as Multiple (Server), click Browse to upload a file and click Update Binding.

- You can login using three different ways: with Credentials, using Service Authentication, or using Agent. Upload the file with the content in the following format:
- For Single certificate selection,
<servername>, <CREDENTIALS>, <site name>, <binding information>, <server credentials>, <temp path>
(and/or)
<servername>, <SERVICE_AUTH>, <site name>, <binding information>, <temp path>
(and/or)
<servername>, <AGENT>, <site name>, <binding information> - For Multiple certificate selection, include <domain name> in the above format
Example: testServer,CREDENTIALS,test.com,Default Web Site,*:443:myhost,testUSer,testPwd,C:\ - For Multiple certificates with same common name, include <domain name> along with the <serial number> in the above format.
Example: testServer,SERVICE_AUTH,test.com,se123245d,Default Web Site,*:443:myhost,C:\
- For Single certificate selection,
- You can login using three different ways: with Credentials, using Service Authentication, or using Agent. Upload the file with the content in the following format:
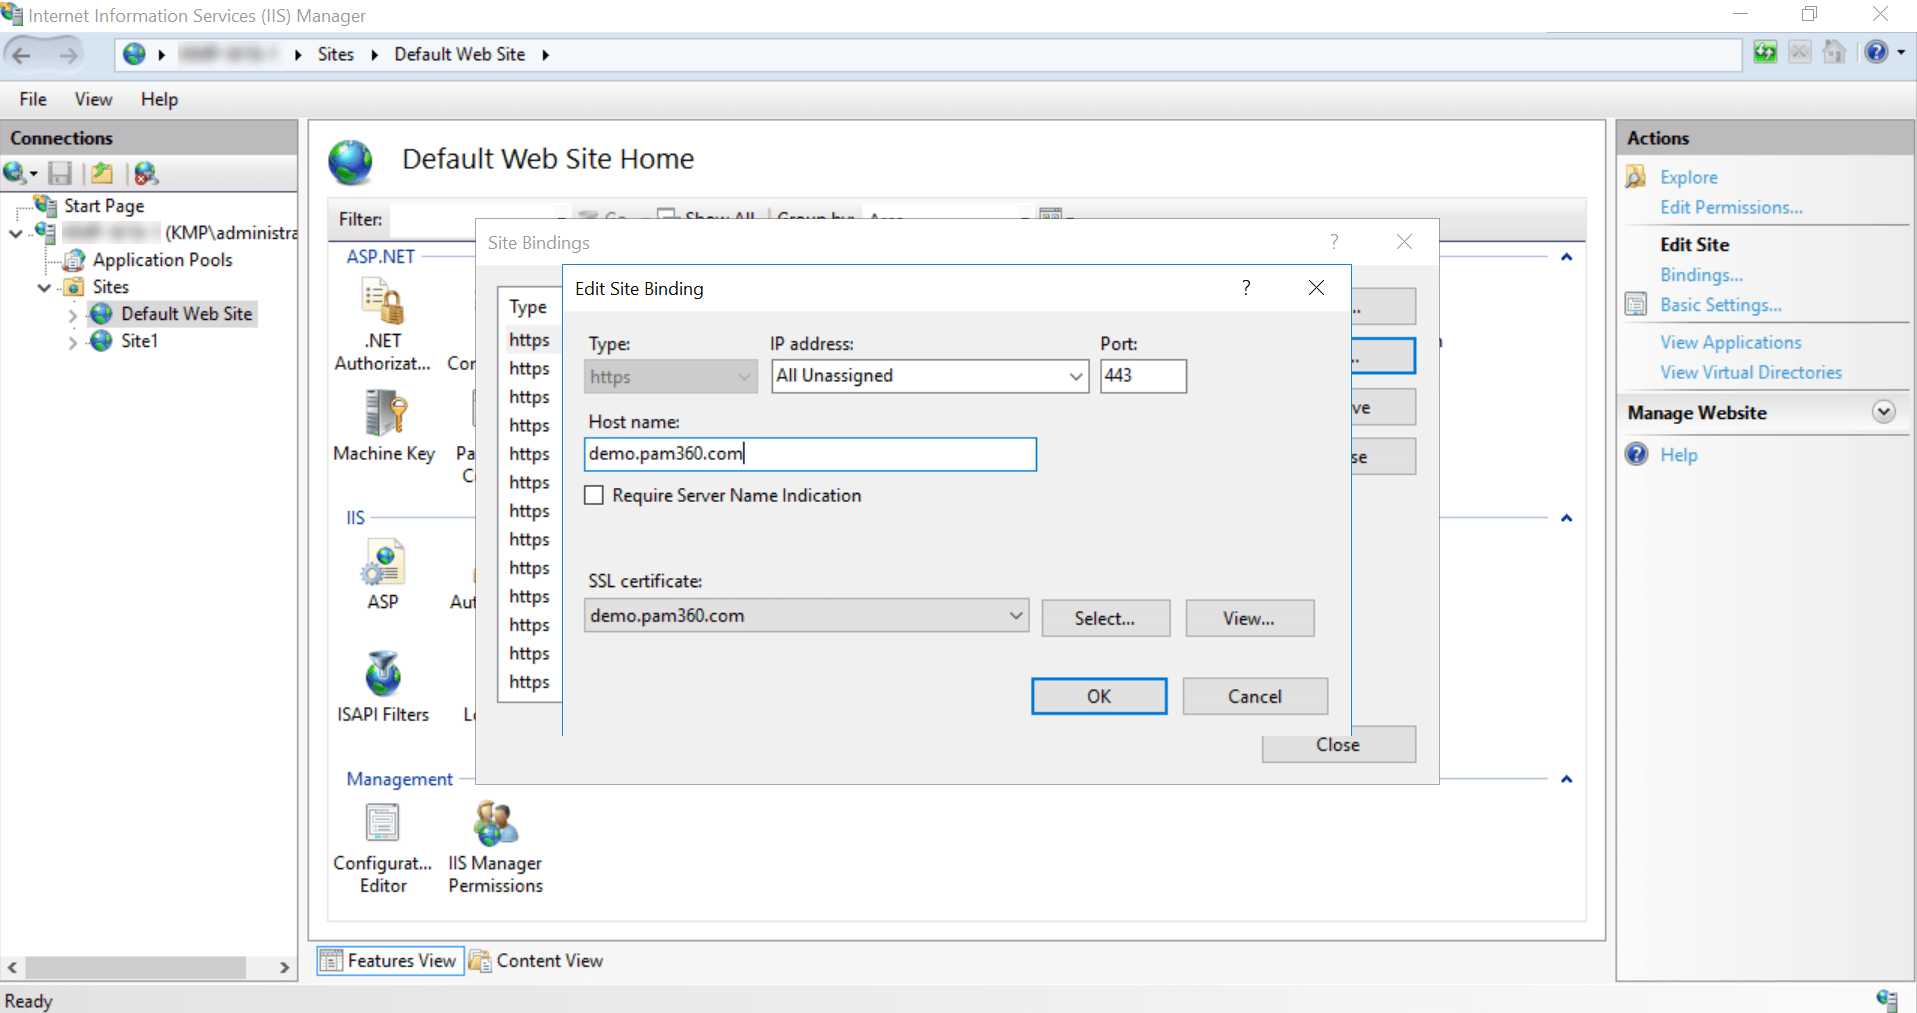
- If the IIS Server resides in a demilitarized zone, choose the Deployment Type as Agent. Select an agent from the drop-down. Click Get Sites And Bindings to list all sites and their respective bindings available in the selected server. Enter the name of a site in the Site Name field, click Get Bindings to list all the bindings available for that site.
- Here, to add new bindings, click Add New Bindings and enter attributes such as Host Name, Port, IP Address, and select a certificate. Select the checkbox to Require Server Name Indication while configuring and updating IIS Binding. The newly added bindings will be visible under Admin >> SSH/SSL Config >> IIS Binding. The new site bindings added in PAM360 will not reflect in the IIS server until they are deployed to the server using the Deploy and Bind option.
- To populate the list of sites associated with the IIS server, click Get Site Names and choose a site from the drop-down. To enter a site name manually in the SiteName field, click Hide List, type in the site name and click the Get Bindings option.
- Enter the Host Name, IP Address and Port of the site manually.
- Select the Restart Site option to restart the site automatically.
- Click Add Binding/Update Binding to deploy the certificate at the path specified in your IIS server and complete IIS site binding.
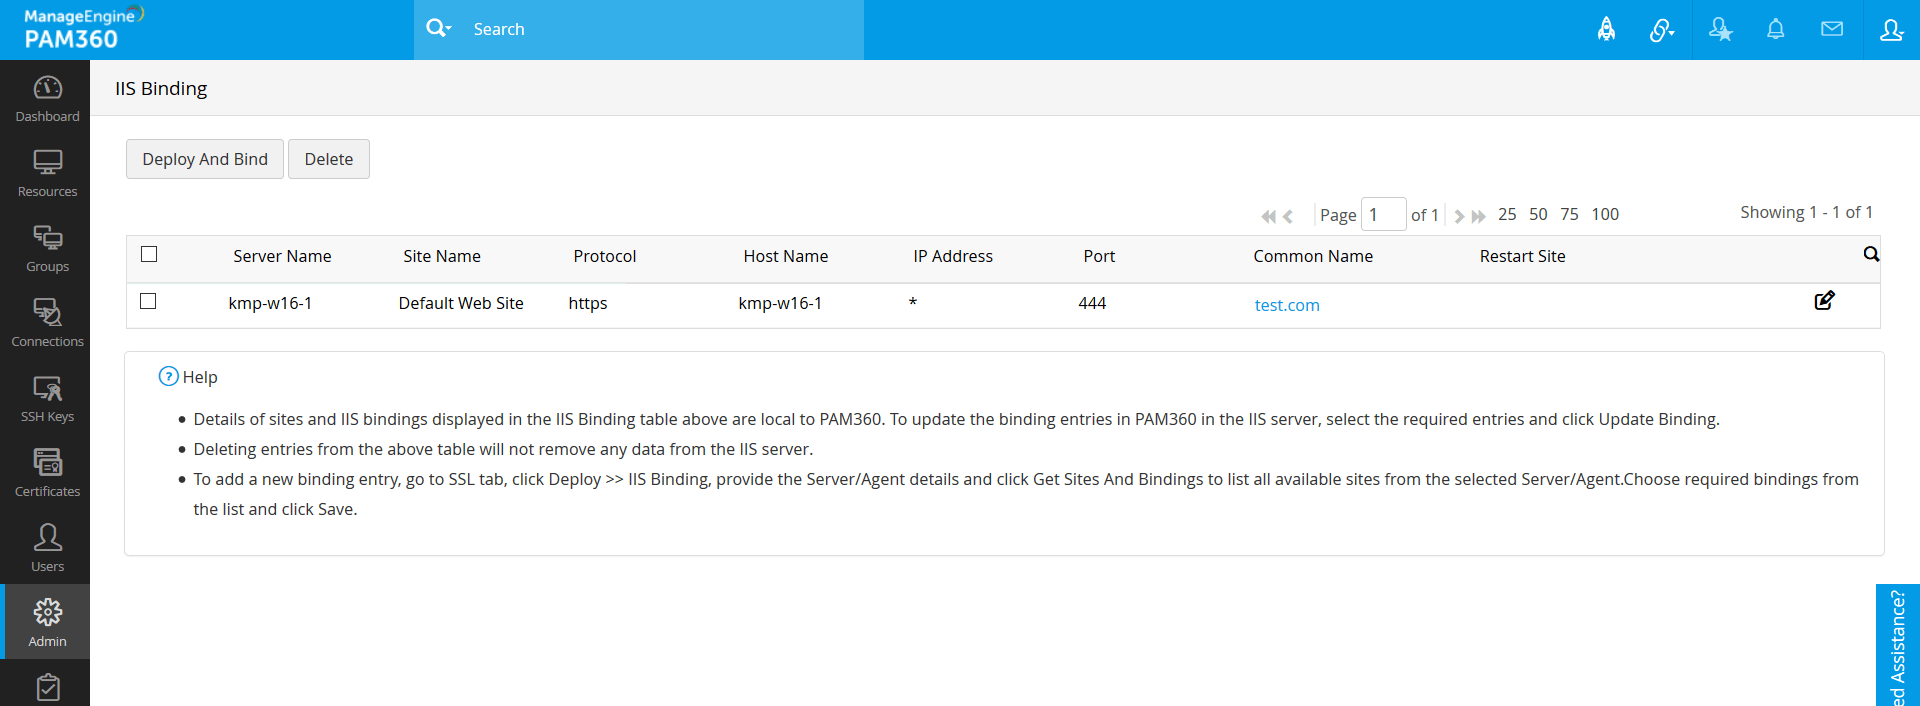
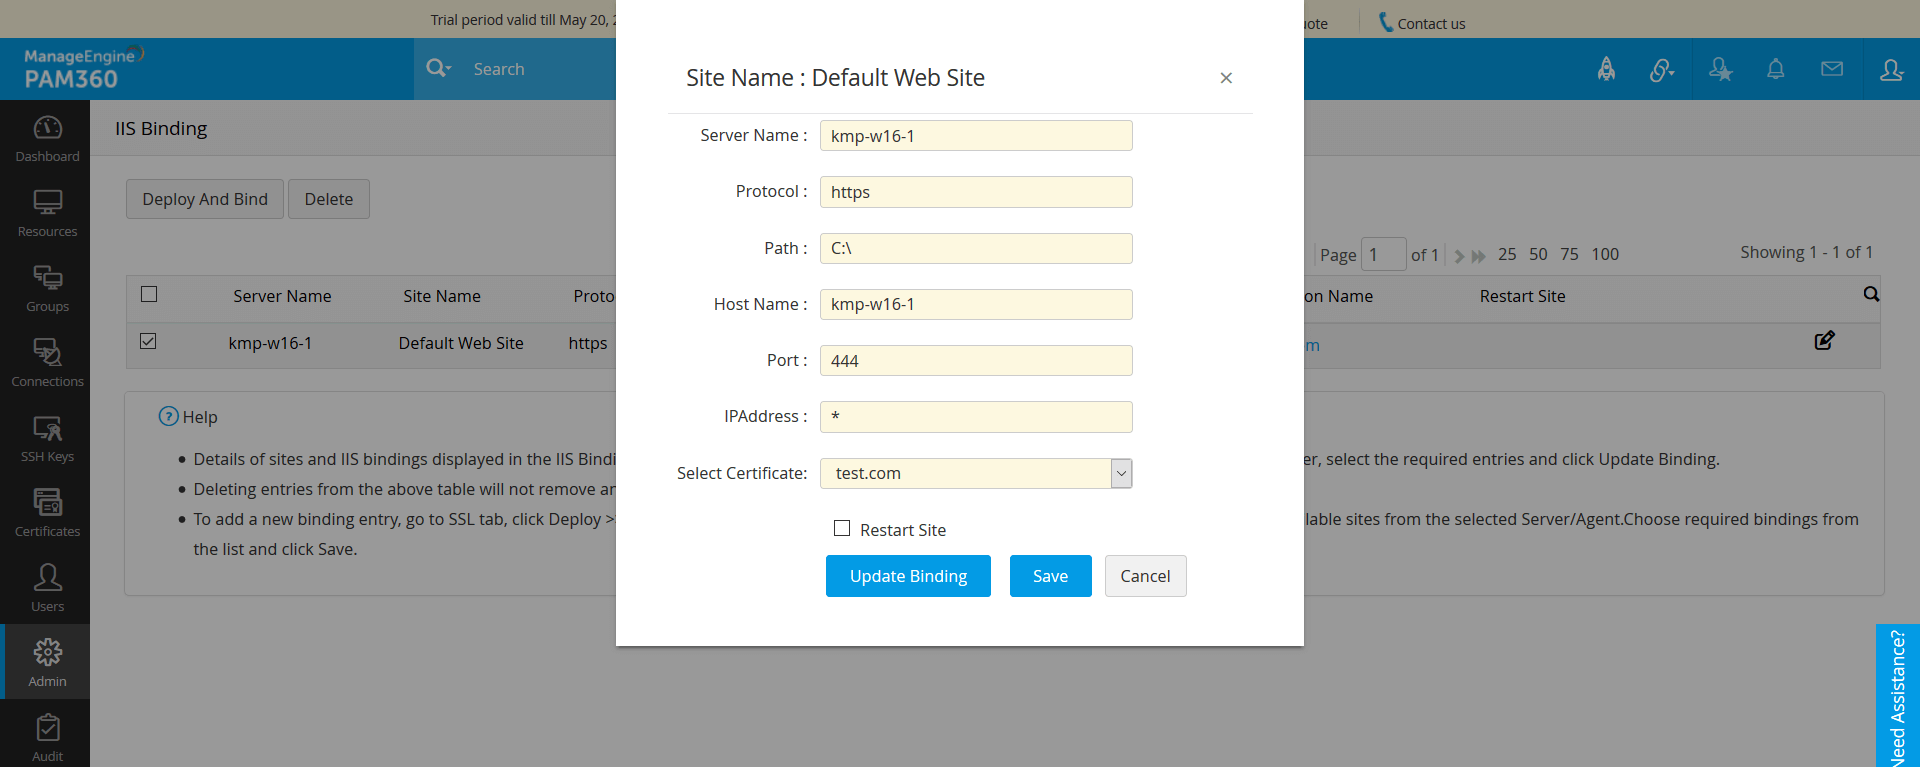
- To update multiple bindings, select the required bindings from the list, click Save. Go to Admin >> SSH/SSL >> IIS Binding, select the bindings and click Deploy and Bind.
- To save the specified details and deploy the certificate later, click Save. The server details and the respective site details will be available under Admin >> SSH/SSL >> IIS Binding.
- To edit the binding details, click the Edit icon beside a server. In the window that opens, modify any of the given details and click Save. Now, select the server name and click Deploy And Bind from the top bar. The selected certificate will be deployed on the servers and the IIS binding will be updated in the IIS server.
- Details of sites and IIS bindings displayed in the IIS Binding table above are local to PAM360. To update the binding entries here with the entries from IIS server, select the required entries and click Update Binding.
- Deleting entries from the above table will not remove any data from the IIS server.
- If you choose the deployment type as Single, enter the required details: Server Name, User Name, Password, Path, Site Name.
1.5 Deploying Certificates to a Linux Server
- To deploy certificates to a Linux server, choose the server type as Linux.
- Select the Deployment Type as Single or Multiple as per your need.
- For Single server deployment, provide the required details: Server Name, Port (port 22 is assigned by default), User Name, Password, Path. You can optionally enable Certificate to choose the File Type and mention the Certificate File Name or/and enable JKS/PKCS to choose the Keystore Type and mention the Store File Name.

- You can opt for a key-based authentication for password-less servers by choosing the Import Key credential type. Upload the private key associated with the required user account in the target server and provide the key passphrase.
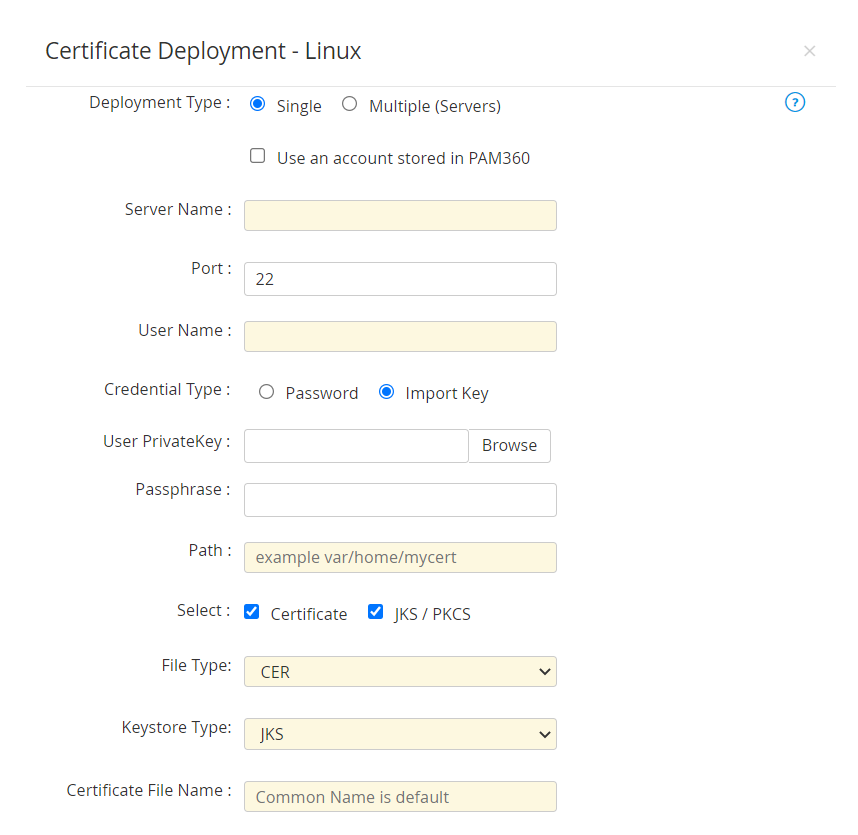
- If you select the checkbox Use an account stored in PAM360, you need not provide the password as PAM360 will take the user account details directly from the database.
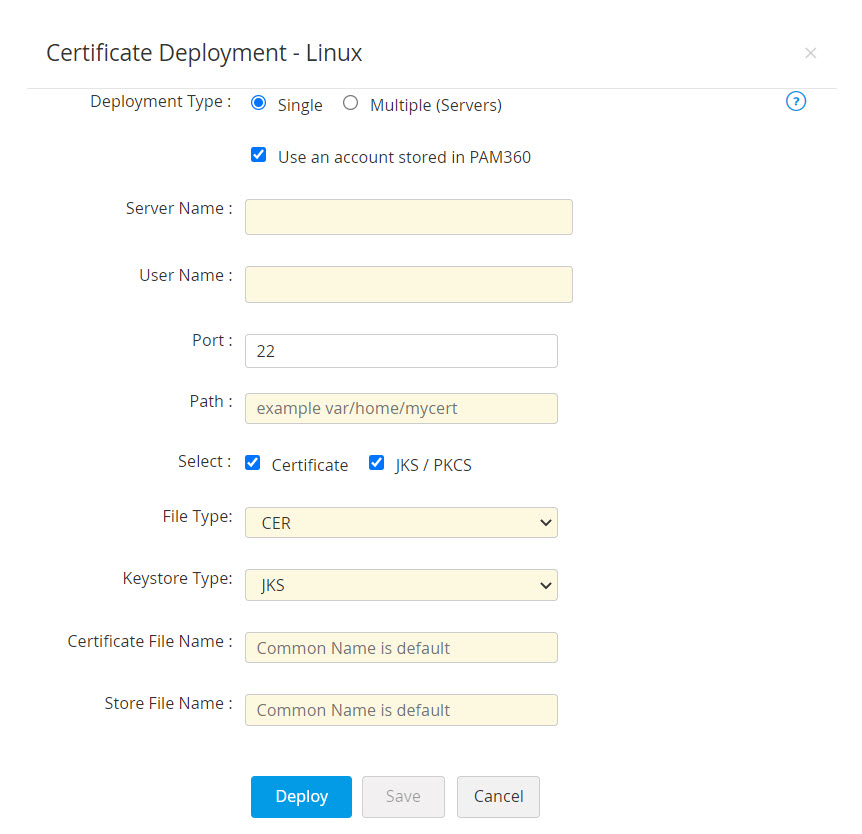
- For certificate deployment on Multiple servers, upload a .csv file comprising the following details: Server Name, User Name, Password, Path, Certificate file name (optional), Keystore File Name(optional). You can optionally enable Certificate to choose the File Type or/and enable JKS/PKCS to choose the Keystore Type.
- You can also opt for a key-based authentication for password-less servers by choosing the Import Key credential type. Upload the Private Key associated with the required user account in the target system and provide the key Passphrase.
- For Single server deployment, provide the required details: Server Name, Port (port 22 is assigned by default), User Name, Password, Path. You can optionally enable Certificate to choose the File Type and mention the Certificate File Name or/and enable JKS/PKCS to choose the Keystore Type and mention the Store File Name.
- After providing the details, click Deploy.
The certificate is deployed to the specified server in the specified path.
- Key-based authentication option is available for single deployment type only.
- The private key uploaded during key-based authentication is for one-time use only and is not stored anywhere in the PAM360 database. If you wish to add it to the PAM360 repository, use the Import Keys option from the SSH Keys tab to do it manually.
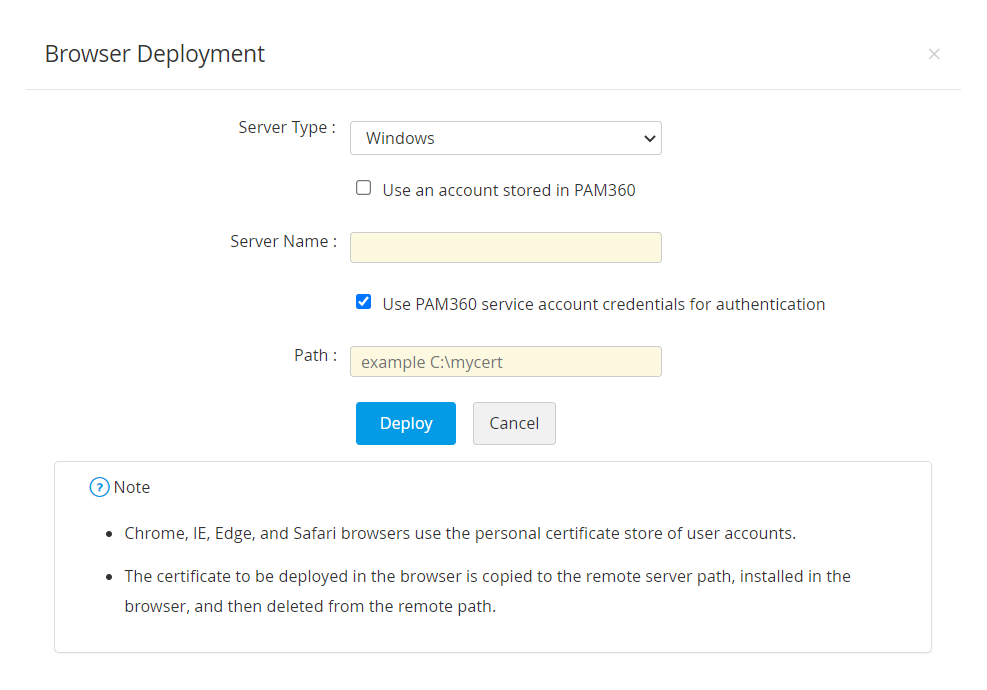
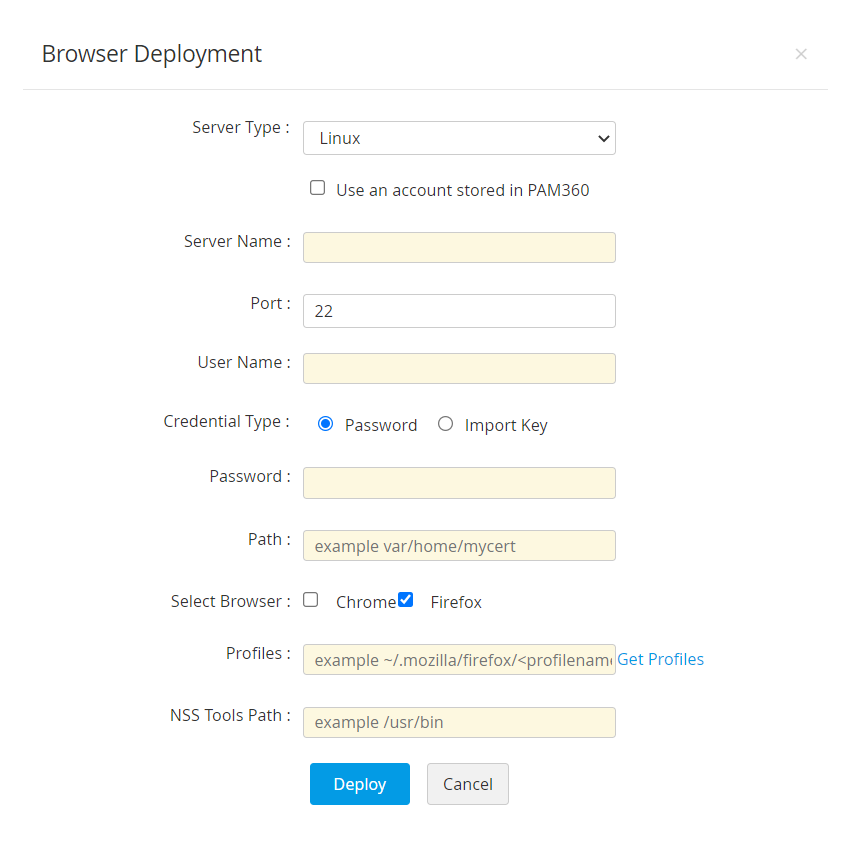
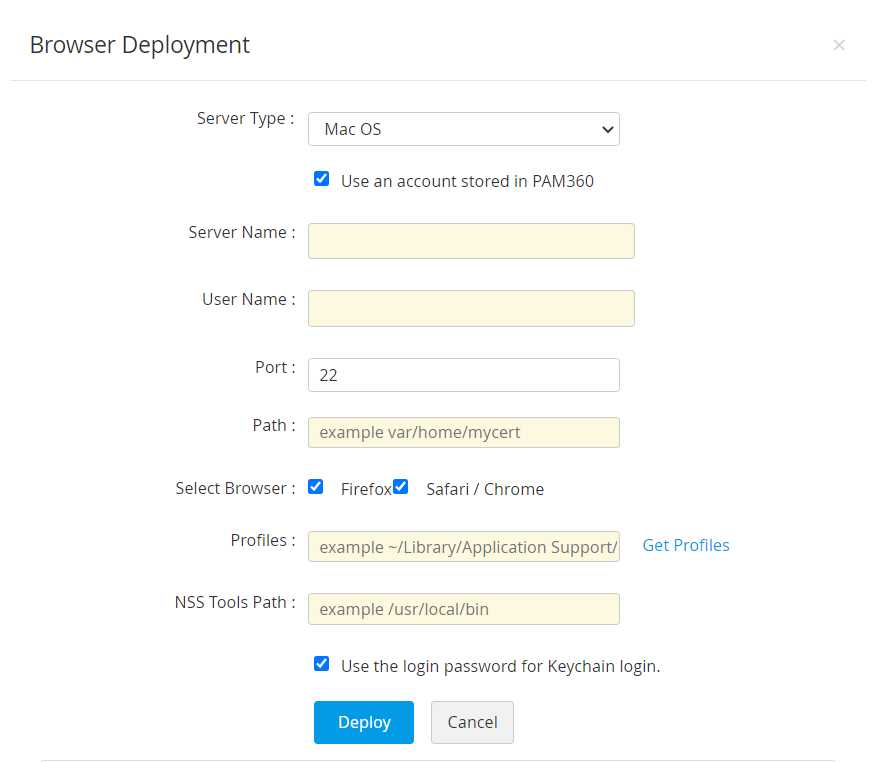
1.6 Deploying Certificates to a Browser
- To deploy certificates on a browser, choose the deploy type as Browser.
- Select the Server Type as Windows, Linux or Mac OS as per your need.
- If you select the checkbox Use an account stored in PAM360, you need not provide the password as PAM360 will take the user account details directly from the database.
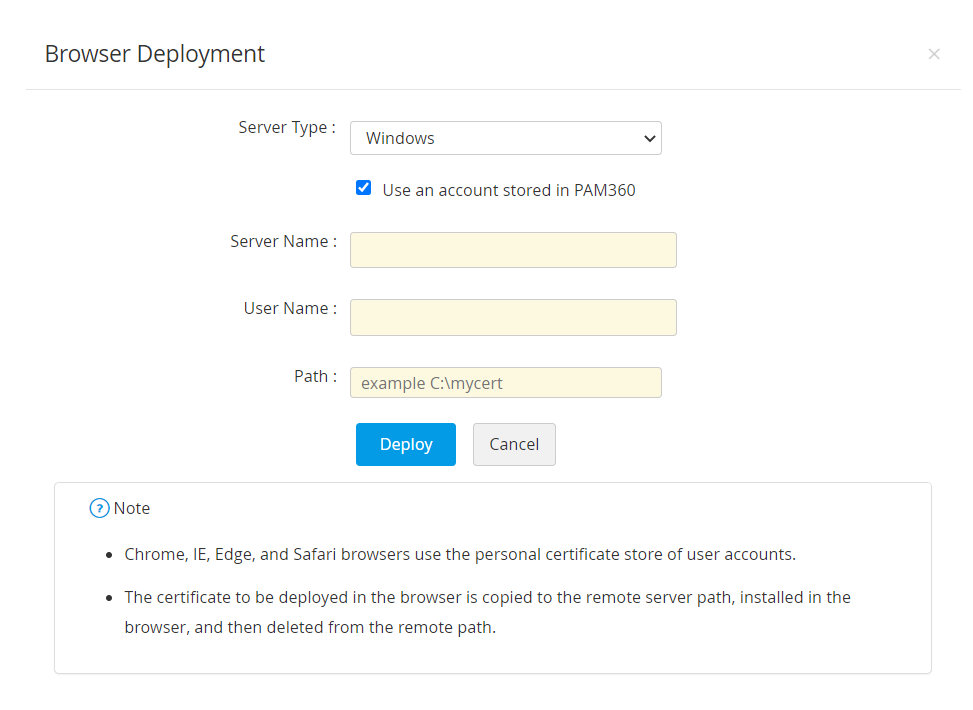
- If the server type is Windows,
- Mention the Server Name, User Name, Password and Path.
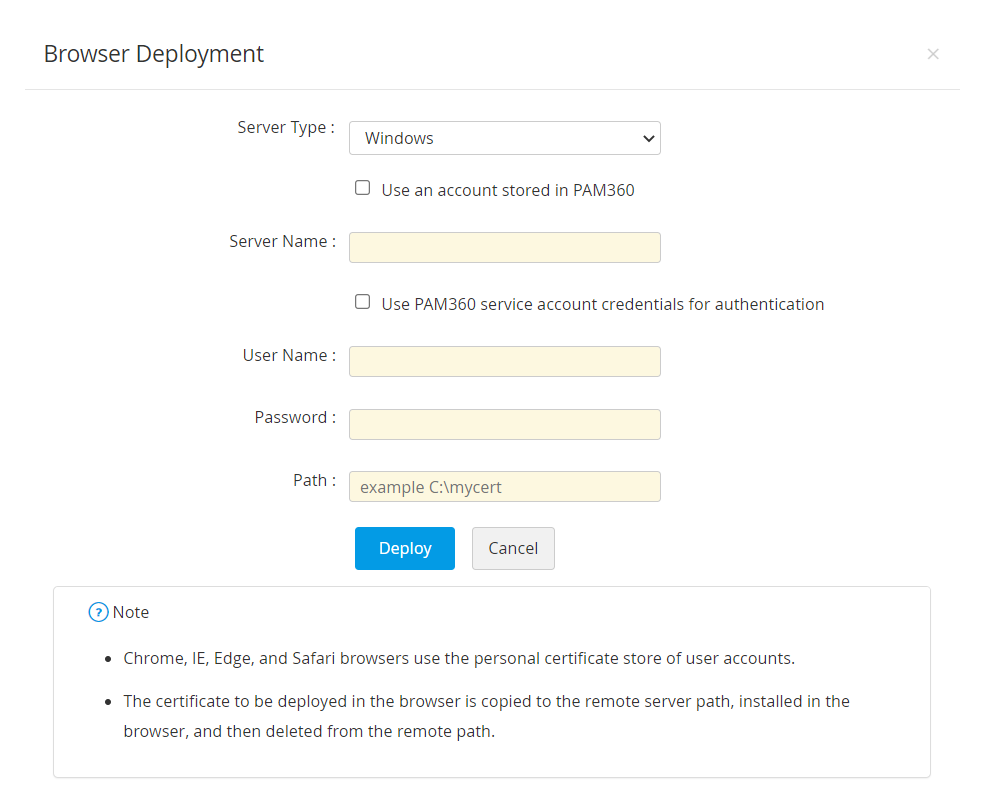
- If you select the checkbox Use PAM360 service account credentials for authentication, you need not provide the User Name and Password separately, as the service account credentials used for PAM360 will be used here too.
- Mention the Server Name, User Name, Password and Path.
- If the server type is Linux,
- Enter the Server Name, Port, User Name, Password and Path.
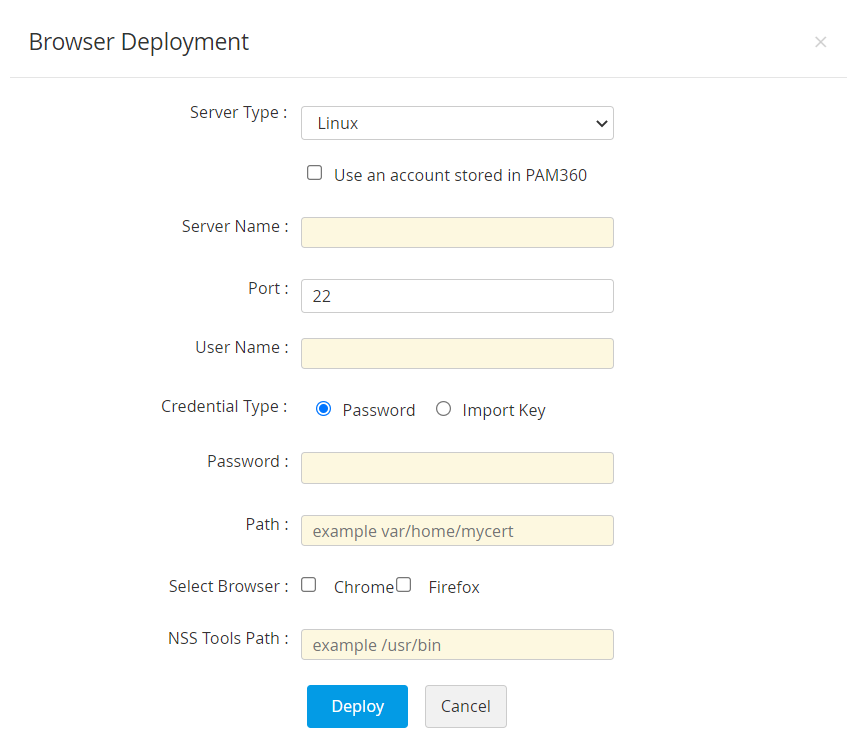
- Select the required Browser(s) (Firefox or/and Chrome) where the certificate is to be deployed.
- If you select Firefox, mention the Profile name. Click Get Profiles to choose from available profiles.
Note:
Get Profiles option gets all profiles path from profiles.ini file from the following location:
Windows: APPDATA\Mozilla\Firefox\profiles.ini
Linux: $HOME/.mozilla/firefox/profiles.ini
Mac: $HOME/Library/Application Support/Firefox/profiles.ini - Mention the NSS Tools Path.
Notes:
- In Linux, Chrome and Firefox use NSS shared DB to manage the certificates. This NSS tool can be installed using the following command: sudo apt-get install libnss3-tools.
- For Chrome, the certificate is deployed in NSS DB in the following path: $HOME/.pki/nssdb.
- For Firefox, Profiles folder contains the NSS DB to manage certificates.
- In Linux, Chrome and Firefox use NSS shared DB to manage the certificates. This NSS tool can be installed using the following command: sudo apt-get install libnss3-tools.
- You can also opt for a key-based authentication for password-less servers by choosing the Import Key credential type. Upload the User PrivateKey associated with the required user account in the target system and provide the key passphrase.

- Enter the Server Name, Port, User Name, Password and Path.
- If the server type is Mac OS,
- Enter the Server Name, Port, User Name, Password and Path.
- Select the required Browser(s) (Firefox or/and Safari/Chrome) where the certificate is to be deployed.
- If you select Firefox, mention the Profile name and NSS Tools Path. Click Get Profiles to choose from available profiles.
- If you select Safari/Chrome you can choose to Use the login password for Keychain login or mention the Login Keychain Password.
Note: For Safari and Chrome, Mac OS uses System Keychain to manage certificates. For Firefox, NSS DB from profiles manages the certificates. To install NSS utils, use the following command: brew install nss.
- Click Deploy.
Now, you have successfully deployed the certificate to the selected browsers.
1.7 Deploying Certificates to ManageEngine MDM
To learn about deploying certificates to ManageEngine MDM, click here.
1.8 Deploying Certificates to AWS-ACM
To learn about deploying certificates to AWS-ACM, click here.
1.9 Deploying Certificates to Load Balancer
- To deploy certificates on a LoadBalancer, choose the deploy type as Load Balancer.
- In the pop-up that appears, select the Citrix ADC as the Load Balancer Type.
- Select the required Citrix Credential List from the dropdown.

- Click Manage Credentials to add or delete a credential.
- In the pop-up that appears, click to Add and mention the Credential Name, Server Name, Citrix Username and Citrix Password.
- Click Test Login to test the credential and click Save Credentials.
- To Delete a credential, select a credential you want to delete and click Delete and in the pop-up that appears click Ok.

- Enter the Citrix Password and a Passphrase. You can also use the Generate Password icon to generate a secure passphrase.
- During Citrix load balancer discovery using REST API, you can choose to bypass your proxy server settings by selecting the Bypass Proxy Settings checkbox. This option is allows you to bypass the proxy server you have enabled under Admin settings directly perform Citrix load balancer discovery through the internet.
- Select Service Deploy. In the pop-up that appears, select the services to deploy the load balancer and click Select Services.
- Select Virtual Server Deploy. In the pop-up that appears, select the virtual servers to deploy the load balancer and click Select Virtual Servers.
- Click Deploy.